QAD Enterprise Asset Management 2017.1
>
User Guide
>
Inventory
>
Inventory
>
Defining an MRO Part
Defining an MRO Part
Follow these steps to define an MRO part:
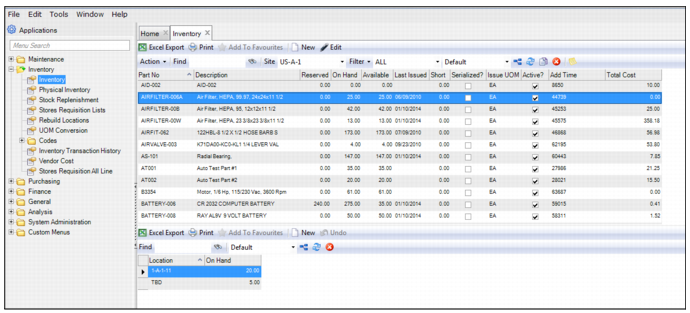
1 Open the Inventory browse located in Inventory|Inventory.
Inventory Browse
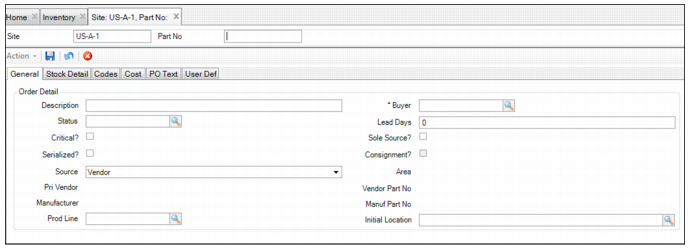
2 Click New. A blank MRO part record opens. In the Part No field, enter a unique part number.
Blank MRO Part Record
3 Enter information in relevant fields on the General, Stock Detail, Codes, Cost, PO Text, and User Defined tabs.
4 Once all the information has been entered, click Save.
Filling Out the MRO Part Record
An MRO part record contains information about the part. The part number and current site are displayed above the associated tabs. When defining an MRO part record, enter the relevant information in the following tabs:
Inventory: General Tab
The General tab is used to record inventory order information.
Inventory: General Tab
Description
Enter the part’s primary description.
Commodity
Enter or select from the lookup the commodity code assigned to this part. This field is mandatory when Buyer/Commodity Purchasing? is selected on the General|Business Units|Domain|Inventory tab.
Buyer
Use the lookup to select the buyer’s employee ID. When Buyer/Commodity Purchasing? is selected on the General|Business Units|Domain|Inventory tab, this field defaults to the buyer specified for the associated commodity and cannot be edited.
Status
Enter or select the status from the lookup.
Lead Days
Enter the number of days a vendor requires to deliver an ordered part.
Critical?
Select this check box if this part is critical. This setting enables sort and filter for stock replenishment selection.
Sole Source?
Select this check box to use sole sourcing and its expedited purchase process for stock replenishment.
Rotable?
Select this check box to identify this part as a serialized and repairable part. For more information, see
Managing Rotable Parts.
Consignment?
Select this check box to indicate that this part is consigned from a vendor. For more information, see
Managing Consignment Inventory.
Note: You cannot select both consignment and rotable for the same part.
Source
Select vendor to buy, or internal to build this part.
Area
This field refers to an internal build or fabrication location.
Note: Area is required for an internally sourced part.
Pri Vendor
The system displays the primary vendor ID specified on the Vendor Parts submenu.
Vendor Part Number
The system displays the part number the vendor uses to identify this part specified on the Vendor Parts submenu.
Manufacturer
The system displays the manufacturer for the part specified on the Vendor Parts submenu.
Manufacturer Part Number
The system displays the number the manufacturer uses to identify this part specified on the Vendor Parts submenu.
Prod Line
Select a Product Line code from the lookup.
Note: The codes entered here are used exclusively for SAF accounting purposes set up in QAD Enterprise Edition Financials. Add and edit product line codes in System Administration|Product Line. The product line codes defined there must match the corresponding product line codes in the QAD ERP.
Initial Location
Enter the bin location of the part.
Inventory: Stock Detail Tab
The Stock Detail tab is used to enter stocking information for a part.
Inventory: Stock Detail Tab
On-Hand
Displays the quantity (in Issue UOM) of this part currently in inventory at all bin locations for this site. When a part is received or issued, the on-hand quantity automatically changes. This field is not updateable, however you can change the on-hand quantity using the Adjust action. Adjust is typically done after a physical inventory is performed and you discover a discrepancy between the system record and the physical count.
Reorder Point
Enter the amount at which the part should be reordered. If you enter an amount in this field, you can run stock replenishment routines based on the reorder point. You can also set the system to send an e-mail to the Notify user for the part if it is at or below reorder point.
Reserved
A system-calculated field that displays the total quantity of the part that is reserved on stores requisitions. When calculating the reserved quantity, the system looks at all of the stores requisitions that have reserved the part. This field is not updateable by the user.
Note: You cannot reserve a part if the available quantity is 0.
On Hand Qty - Reserved Qty = Available Qty
For example, if there are 10 unreserved parts in stores and the user attempts to reserve 12, the system only allows the user to reserve 10 and it shows a shortage of 2.
Min Order Qty
Displays the minimum economical amount to order.
When you create a requisition, there is a hierarchy for determining the minimum order quantity. When a part record is created, the default value for this field is 0 UOM. If this field is set to 0 UOM, the quantity requested on the requisition equals the quantity ordered on the requisition, provided that the quantity requested is greater than or equal to 1.
EAM checks the vendor part number on the requisition for a minimum order quantity for that number. The vendor has dictated this quantity. If no minimum order quantity is specified for the vendor part number, then minimum order quantity for the EAM part is used.
Available
Displays the total quantity on hand at all bin locations within a site, minus the quantity on reserve. This quantity represents the parts available to be charged, issued against, issued, or reserved against other stores requisitions. This field is not updateable by the user.
Note: The lowest quantity that can be displayed in this field is 0. If there is a deficit because of attempted reserves, the system displays the quantity of that deficit in the Short field.
Safety Stock
Enter the minimum quantity to keep on hand for a particular part. The stock replenishment can be run to display all parts at or below safety stock or reorder point. If the part is at or below the safety stock level, the system can be set to send an e-mail to the Notify user for the part.
Short
The system calculates this field to show the number of parts reserved but not available in stores. For example, if there are 10 unreserved parts in stores and you attempt to reserve 12, a shortage of 2 is shown because only 10 can be reserved. The number short is updated based upon reserving, unreserving, receiving, and issuing of a particular part. This field is not updateable by the user.
Mgt Max Qty
This field refers to the optimal amount to stock through stock replenishment, a quantity pre-set by management. This amount represents the minimum economical amount to order.
When you create a requisition, there is a hierarchy for determining the maximum order quantity. When a part record is created, the default value for this field is 0 UOM. If this field is set to 0 UOM, the quantity requested on the requisition equals the quantity ordered on the requisition, provided that the quantity requested is greater than or equal to 1.
EAM checks the vendor part number on the requisition for a maximum order quantity for that number. The vendor has dictated this quantity. If no maximum order quantity is specified for the vendor part number, then the maximum order quantity for the EAM part is used:
Reorder point + Minimum order quantity = Mgt max qty
Planned Order
Displays the planned order quantity for this part, which represents all requisitions with a status of P (planned). The planned order quantity is the quantity ordered on planned requisitions (not yet placed on order). When running the stock replenishment routine, EAM subtracts the planned order quantity from the new quantity required. This prevents a user from running the stock replenishment routine multiple times and over-ordering inventory. This field is not updateable by the user.
Order Unit
To order a part, enter the vendor-designated quantity or the multiple of this quantity to use. If the Order Unit is set at 2, then the system always orders that part in increments of 2, unless there is a UOM Conversion established for the part. Typically, this represents the vendor-designated minimum order quantity required to purchase the part.
On Order
Displays the part’s total quantities on all POs with that item listed. It represents all POs with a status of O (ordered). The system updates this calculated field as parts are ordered and/or received. This field is not updateable by the user.
Issue UOM
This field refers to a unit of measure, such as each, used when issuing a part from stores. When the user purchases parts and receives them into inventory, the purchasing unit of measure is automatically converted to the issuing unit of measure. When you view parts on the Inventory Maintenance screen, the quantity is always listed in the issuing unit of measure.
Example: If a vendor sells parts by the box, but your organization uses and issues the parts by “each,” select “each” for the Issue UOM.
Last Physical
Displays the date of the last physical cycle count for the part. A physical count is when someone actually counts the parts and verifies or corrects the quantity listed as in stock. The date is changed when the Status for a physical inventory for this part is changed to closed. This field is not updateable by the user.
Last Received
Displays the date the part was last received from a purchase order. This date is automatically changed when a receiving transaction occurs. This field is not updateable by the user.
Order UOM
Select the unit of measure to use when ordering the part. For example, if your organization stocks the part by each but you purchase the part in boxes, boxes would be Order UOM.
Note: To use the Order UOM in the part record or on a requisition, a unit of measure conversion must be valid for the part. Establish a UOM conversion before adding it in the Inventory record. For example, if Order UOM for a part is box, Issue UOM is each, and the multiplier is 10, when you order a box for the part, EAM converts the quantity, resulting in 10 units available.
ABC Code
Classify each part as A, B, or C, based on its relative inventory value used for cycle count planning.
Last Issued
Displays the date that this part was last issued from inventory. Using reports and filters, you can identify parts only issued from a certain date, which enables you to identify inactive or slow-moving parts. This field is not updateable by the user.
Physical Due
Displays the date of the next required physical inventory. You can search or filter for parts by this date.
Date Created
Displays the date this inventory record was created.
Inventory: Codes Tab
The Codes tab is used to enter stocking information for a part.
Inventory: Codes Tab
Type
Use the part type for reporting and filtering purposes in inventory only. For example, specify a type code in a filter in stock replenishment or physical inventory.
Class
Use the part class for filtering and ordering purposes in inventory only.
Commodity
Group general classifications of parts with this user-defined table in inventory, requisition, and vendor modules. Associate a part with a user-defined commodity code copied to a requisition for that specific part. Associate vendors with a list of codes for commodities that they can supply to your company.
Notify
Notify this user ID or group by e-mail when inventory stock drops to or below the reorder point or safety stock.
Catalog
The inventory table is hierarchical. The higher level, catalog, can be a broad grouping of parts.
Sub Catalog
The lower level, subcatalog, consists of types in the catalog.
Size
Select the size to assign to a part.
Planner
The employee name or code for the planner.
MSDS No
Use the lookup to select a code that is tied to descriptions of the MSDS (Material Safety Data Sheet).
Note: MSDS sheets may be stored elsewhere in the organization. EAM cross-references these sheets.
Weight
The weight of the part.
Weight UOM
The weight unit of measure for this part; for example, pounds or kilograms.
Active?
Select this check box if a particular part is active. Inactive parts do not display in the lookup.
Add to BOM?
Select the check box to add the part to the equipment BOM on issue.
Auto Issue?
Select this option to determine whether to auto issue and expense this non-inventoried part on receipt.
Note: Because auto-issue parts are non-inventoried parts, you cannot perform the following actions in the Inventory Action menu: Return to Inventory, Relocate, and Adjust.
Taxable?
If the part is taxable, select this check box.
Tax Code
The system copies the tax code for the part to the requisition for the part, unless assigned a project tax code. If the part has a special tax status, add a tax code to the part. Typically leave a part’s Tax Code field blank.
Tax Class
The system copies the tax class for the part to the requisition.
Tax Usage
The system copies the tax usage for the part to the requisition.
Commodity Code
Enter a valid code based on a selection from the lookup for codes defined in Intrastat Commodity Code Maintenance in EE. If no code is entered specifically for the part, then the code from Intrastat Control defaults for the PO line.
Inventory: Cost Tab
The Cost tab is used to list unique accounting data for a part.
Inventory: Cost Tab
Inventory. Typically, you leave Inventory fields blank, unless you intend to debit accounting data that is different from the system default upon receipt.
Inventory Dept
Transfer the inventory value upon receipt of the part to this inventory department code.
Inventory Acct No
Transfer the inventory value upon receipt of the part to this account. At issue, EAM credits the cost of the part from the inventory account number and that value is redirected or expensed to the entity that consumes that part; for example, equipment, project, work order.
Inventory Cost Cntr
Transfer the inventory value upon receipt of the part to this cost center. At issue, EAM credits the cost of the part from the inventory account number and that value is redirected or expensed to the entity that consumes that part; for example, equipment, project, work order.
Inventory Sub Acct
This field refers to the sub-account to which the part’s inventory value is associated.
Note: If the inventory accounting data changes, the system prompts you to create new records and GL transactions.
Adjustment. Typically, you leave Adjustment fields blank, unless you intend to debit accounting data different from the system default upon receipt.
Adj Department
The department affected by an inventory adjustment transaction.
Adj Acct No
The account number affected by an inventory adjustment transaction, manually or through the Physical Inventory module. This account overrides the system default adjustment account.
Adj Cost Center
The cost center affected by an inventory adjustment transaction, manually or through the Physical Inventory module. This cost center overrides the system default adjustment cost center.
Adj Sub Acct No
The sub-account number affected by an inventory adjustment transaction, manually or through the Physical Inventory module.
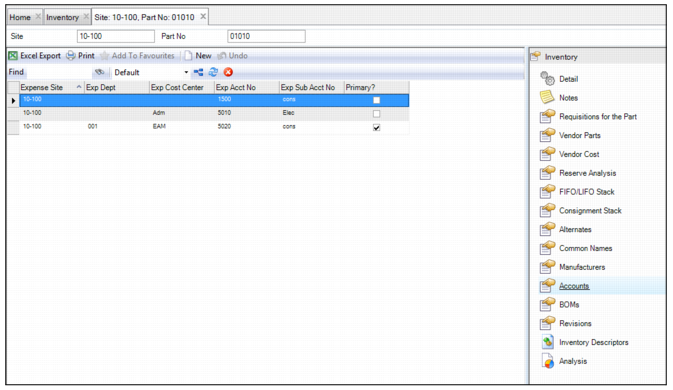
Primary Expense. Expense fields are display-only. Data comes from the Accounts submenu. Use this information for parts such as consumables not charged directly to a project, equipment, or work order. You can set up more than one expense accounting combination, but one must be the Primary.
Expense Site
Charge this part to the site you indicate here.
Exp Dept
Charge the primary department for this part.
Exp Acct No
Charge this primary account number when issuing this part from stores.
Exp Cost Center
Charge the primary cost center when issuing this part from stores.
Exp Sub Acct No
Charge the primary sub-account number when issuing this part from stores.
Consignment. Suppliers stock inventory at the customer site, but do not bill the customer until inventory is issued from the storeroom. This provides critical spares available on demand, with payment due at the time of issue. You need consignment inventory and adjustment accounts for consignment transactions. If there is data in these fields on the part record, it is used on GL transactions created when an inventory transaction is done against a consignment part. Otherwise, EAM uses System Site defaults established at General|Business Units|Sites on the Inventory tab.
Cons Asset Dept
This field refers to the consigned asset department used for any transactions that occur for the vendor-owned stock for this part.
Cons Adj Dept
This field refers to the consigned adjustment department for any adjustments of the vendor-owned stock for this part.
Cons Asset CC
This field refers to the consigned asset cost center used for any transactions that occur for the vendor-owned stock for this vendor.
Cons Adj CC
This field refers to the consigned adjustment cost center used for any adjustments of the vendor-owned stock for this part.
Cons Asset Acct
This field refers to the consigned asset account used for any transactions that occur for the vendor-owned stock for this vendor.
Cons Adj Acct
This field refers to the consigned adjustment account used for any adjustments of vendor-owned stock for this part.
Note: If the Send Cons ERP? check box on the Vendor|Codes tab is clear for this vendor, the QAD ERP application does not create GL transactions.
Cons Asset Sub
This field refers to the consigned asset sub-account used for any transactions that occur for the vendor-owned stock for this part.
Cons Adj Sub
This field refers to the consigned adjustment sub-account for any adjustments of the part’s vendor-owned stock.
Cost.
Cost
The current cost per issue UOM.
Note: The label for this field depends on the costing method (LIFO, FIFO, weighted average).
OH Group
Enter the overhead group into this field.
Fixed
Overhead value as a fixed amount. Defined in Overhead Groups.
Rate (%)
Overhead value as a percentage. Defined in Overhead Groups.
Total Cost
The system multiplies the cost by the overhead percentage and adds the result to the part cost. If no overhead percentage exists for this part, the Total Cost equals the regular part cost.
Est Freight
Use this field to estimate freight cost on a requisition, expressed as a percentage of the part’s cost.
Inventory: PO Text Tab
The PO Text tab is used to add an expanded definition of the part.
Inventory: PO Text Tab
PO Text
Enter an expanded description, specifications, or other data for you and the supplier to identify the part. The purchase order may contain this information.
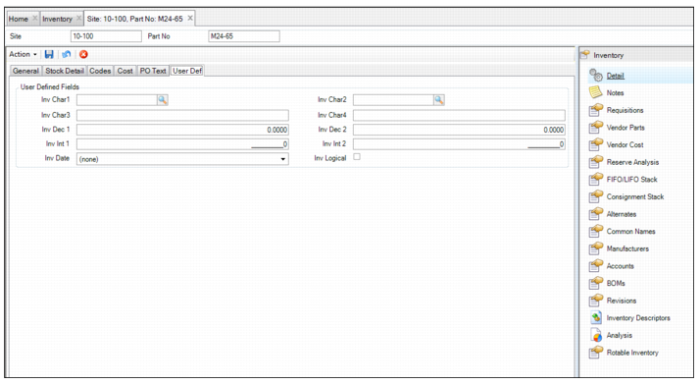
Inventory: User Defined Tab
The User Defined tab is used to track information against specific inventory in EAM. There are ten user-defined fields.
Inventory: User Defined Tab
Character 1/2 for Inventory
User-defined character fields, validated against tables that you add.
Character 3/4 for Inventory
Free-form user-defined character fields, not validated against tables.
Inventory Decimal 1/2
User-defined decimal fields for inventory.
Inventory Integer 1/2
User-defined integer fields for inventory.
Inventory Date
A user-defined date field for inventory.
Inventory Logic
A user-defined logical field for inventory.
Setting Up Expense Accounting for a Part
In the Accounts submenu, you can set up specific expense cost centers, departments, accounts, and sub-account numbers to which MRO parts can be issued. When a part is not charged directly to a project, equipment, or work order, it can be charged to the expense accounting combination that is set up in this submenu. By setting up expense accounting for the part, you can avoid clerical errors, such as parts being issued to inappropriate account numbers and cost centers.
Follow these steps to set up expense accounting for a part:
1 Open the MRO part record and select the Accounts submenu.
2 Click New. The system generates a blank expense account line.
3 Enter the relevant information in the following fields:
Expense Site, Exp Department, Exp Account Number, Exp Cost Center, and Exp Sub Account Number
Use the lookups to select the expense account information (expense site, department, account, cost center, and sub-account) to which to charge the part.
Primary?
Select this check box to designate this as the primary expense account combination. When a part is not charged directly to a project, equipment, or work order, it is charged to the primary expense account combination. The expense account line that is designated as primary is displayed in the Primary Expense field on the Cost tab.
4 Once the information has been entered, press Enter to save.
Inventory: Accounts Submenu
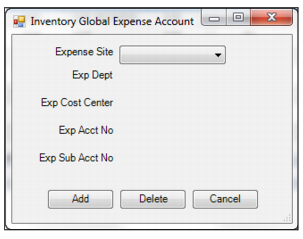
Global Expense Account
The Global Expense Account action allows you to set up expense accounting to multiple records at the same time.
Follow these steps to set up expense accounting for multiple parts:
1 In the Inventory browse, highlight the part records.
2 Select Global Expense Account from the Inventory Action menu. The Inventory Global Expense Accounting window opens.
3 Use the drop-down lists to select the expense elements (Expense Site, Exp Department, Exp Cost Center, Exp Account Number, and Exp Sub Account Number). You have the option of setting the expense accounting for one element or multiple elements.
Global Expense Account
4 Click Add to finish.
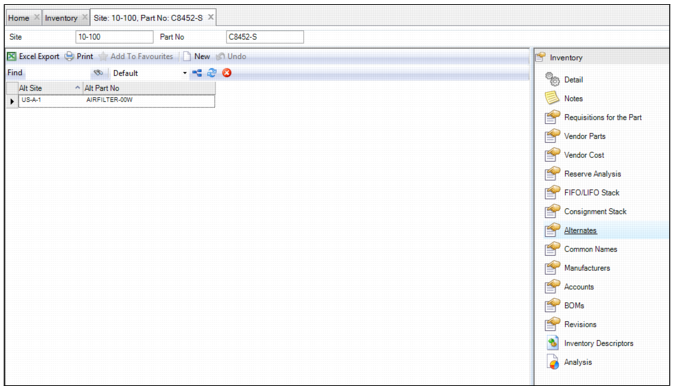
Adding Alternate Part Numbers
The Alternates submenu allows you to add alternate part numbers that are used in other sites. This submenu allows you to cross-reference a part number in one site to a different part number in another site. This is helpful when an organization does not use the same part numbering scheme across sites.
Follow these steps to add alternate part numbers:
1 Open the part record.
2 Select the Alternates submenu and click New. A blank alternate part number line is created.
3 Use the lookups in the Alt Site and Alt Part Number fields to select the alternate site and part numbers.
4 Press Enter to save.
5 Repeat these steps to add additional part numbers.
Inventory: Alternates Submenu
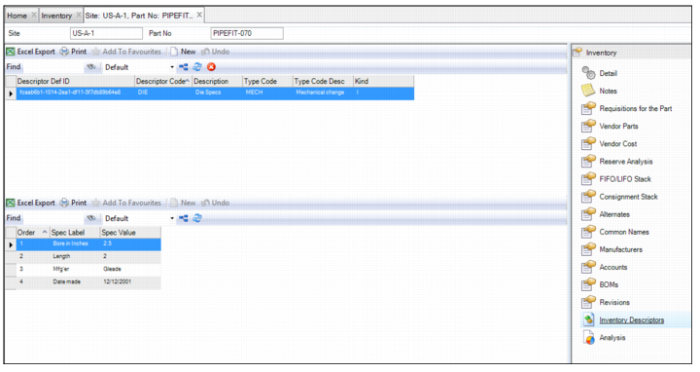
Adding Inventory Descriptors
Inventory descriptors allow the user to set up a standard template for certain technical information, and these descriptors can be associated with an MRO part. A part can have multiple descriptors associated with it. Once the descriptor is associated with a part record, the user can update the information on a field. For information about setting up descriptor codes, see
Descriptor Codes.
Follow these steps to add an inventory descriptor:
1 Open the inventory record and select the Inventory Descriptors submenu.
2 Click New and then use the lookup in the Descriptor Def ID field to select the descriptor.
3 Press Enter to save and to automatically populate the other fields with the associated data.
4 Repeat these steps to add additional descriptors.
Inventory: Inventory Descriptors Submenu
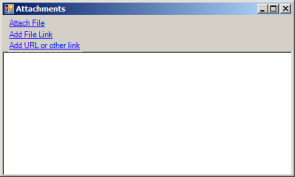
Attaching and Linking Files to a Part Record
EAM allows you to attach and link an unlimited number of files and link an unlimited number of URLs to an MRO part record. If you can run the file on your operating system, you can run it from EAM once it is attached or linked.
Attaching or Linking a File to a Part Record
Attach a File
To attach a file to an MRO part record:
1 Select the part record from the Inventory browse.
2 Select Attachments from the Action menu.
3 In the Attachments window, select Attach File.
4 Locate the file on your computer and click Open. The file is now attached to the part record.
Link a File
To link a file to a part record:
1 Select the part record from the Inventory browse.
2 Select Attachments from the Action menu.
3 In the Attachments window, select Add File Link.
4 Locate the file on your computer and click Open. The file is now linked to the part record.
Link a URL
To link a URL to a part record:
1 Select the part record from the Inventory browse.
2 Select Attachments from the Action menu.
3 In the Attachments window, select Add URL or other Link.
4 Copy and paste the link into the field and then click OK. The URL is now linked to the part record.
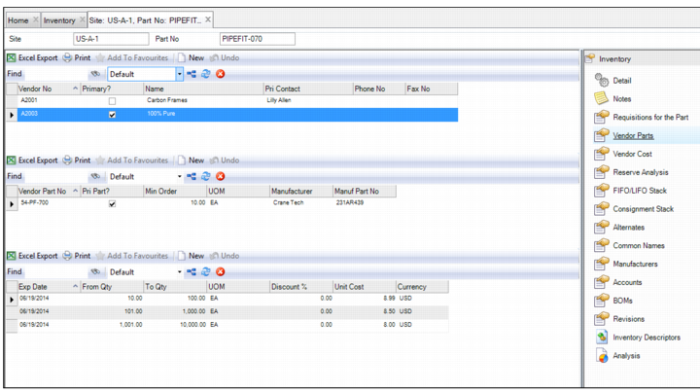
Adding Vendor Parts Information to a Part
The Vendor Parts submenu allows you to associate an unlimited amount of vendor part information to an MRO part. The upper frame of the submenu displays the vendor information, the middle frame displays vendor part information, and the lower frame displays pricing schedules complete with quantity ranges and expiration dates.
Follow these steps to add vendor part information:
1 Open the MRO part record and select the Vendor Parts submenu.
2 Click New in the upper frame.
3 Use the lookup in the Vendor No field to select the vendor that supplies this part.
4 Press Enter to save and automatically populate the rest of the fields.
5 If this is the primary vendor for this part, select the Primary? check box.
6 Add vendor part information by clicking New in the middle frame.
7 Enter the relevant information in the following fields:
Vendor Part No
Enter the vendor’s part number.
Primary Part?
If the vendor has different part numbers for the part, select this check box to identify which part is the primary part number used for reordering.
Min Order
Enter the minimum order amount that the vendor requires.
UOM
Use the lookup and select the part’s UOM.
Manufacturer
Use the lookup to select the manufacturer of the part.
Manufacturer Part No
Enter the manufacturer’s part number.
8 Press Enter to save.
9 Add the pricing schedules by clicking New in the lower frame. Add the relevant information in the following fields:
Exp Date
Use the calendar lookup to select the expiration date for the pricing schedule.
From Qty, To Qty
Enter the quantity ranges in these fields.
UOM
The UOM that was entered in the UOM field in the middle frame.
Discount %
If you buy the part in the quantity range entered in the From Qty and To Qty fields, enter the vendor discount as a percentage.
Unit Cost
If you buy the part in the quantity range entered in the From Qty and To Qty fields, enter the unit cost for the part.
Currency
The currency type of the price list.
10 Press Enter to save.
11 To add additional lines to the pricing schedule, repeat step
9.
Inventory: Vendor Parts Submenu
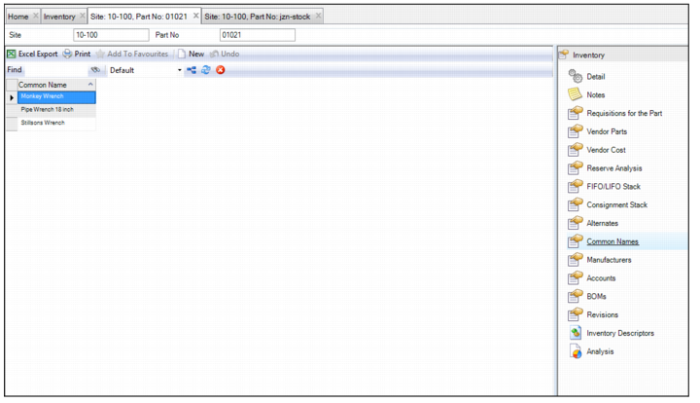
Adding Common Names to a Part
The Common Names submenu allows you to add common names and nouns for a part. By entering common names for parts, employees can search for certain items using those common names. For example, a pipe wrench is commonly called a pipe wrench 18 inch, monkey wrench, or a Stillson’s wrench.
Inventory: Common Names Submenu
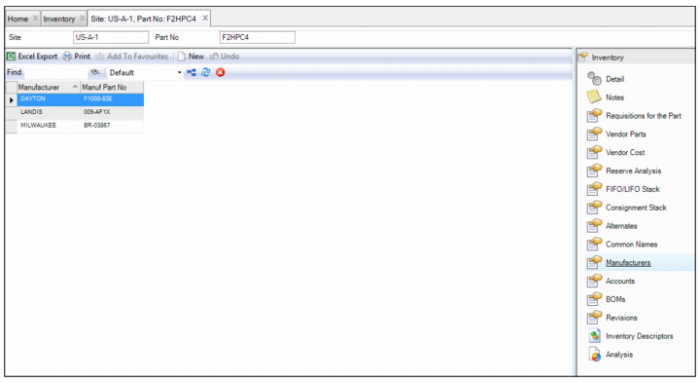
Adding Manufacturers to a Part
The Manufacturers submenu displays all the manufacturers and manufacturer’s part numbers that are added for this part in the Vendor Parts submenu. If necessary, you can add manufacturers and part numbers to this list.
To add additional manufacturers and part numbers, click New. Use the lookup in the Manufacturer field to select the manufacturer. Enter the manufacturer’s part number in the Manufacturer Part No field.
Inventory: Manufacturers Submenu
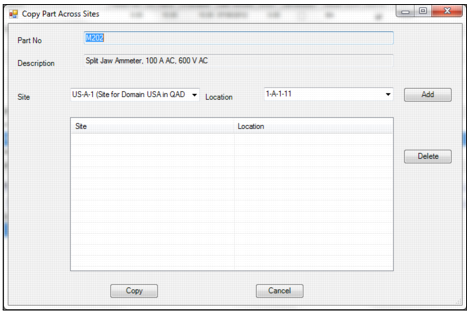
Copy a Part Across Sites
The Copy Part Across Sites action allows you to copy a part record to another site and location. Follow these steps to copy a part to another site:
1 Open the Inventory browse and select the part record.
2 Select Copy Part Across Sites from the Inventory Action menu.
3 The Copy Part Across Sites window opens. The part number and part description are displayed in the Part No and Description fields.
Copy Part Across Sites
4 In the Site and Location drop-down lists, select the site and location to which you want to copy the part record.
5 Click the Add button to add the selected site and location to the list in the middle frame.
6 If necessary, add additional sites and locations to the list. To delete any site and locations from the list, click the Delete button.
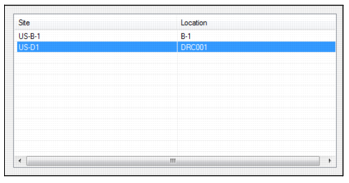
Copy Part Across Sites: Copy List
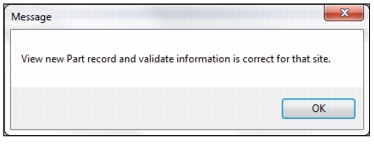
7 Click Copy to copy the part record to the other sites and locations. The system prompts you to verify that the part record has been copied correctly.
Note: To ensure that part descriptions are protected and consistent across all sites, EAM allows you to prevent the part descriptions from being edited when parts are copied to other sites. The ability to edit the Part Description field can be enabled or disabled by selecting the Part Description Protected check box in the Inventory tab on the Domain record. See
Domain: Inventory Tab.
Copy Part Across Sites: Verification Message
Adding Notes to a Part Record
If necessary, you can add notes to a part record. To add notes, open the part record and select the Notes submenu.
The Notes submenu is a free-form text box for notes that are for internal use only and are not printed on any documents.