QAD Enterprise Asset Management 2017.1
>
User Guide
>
Inventory
>
Inventory
>
Managing Rotable Parts
Managing Rotable Parts
A rotable part is a serialized and repairable part such as a pump or motor. EAM allows you to track rotable components that are purchased and stocked in inventory. However, when they are issued, they are treated like equipment. Maintenance repair costs are tracked and PMs can be scheduled for each component.
Rotable Part Information
View Serialized Parts for a Rotable Part Number
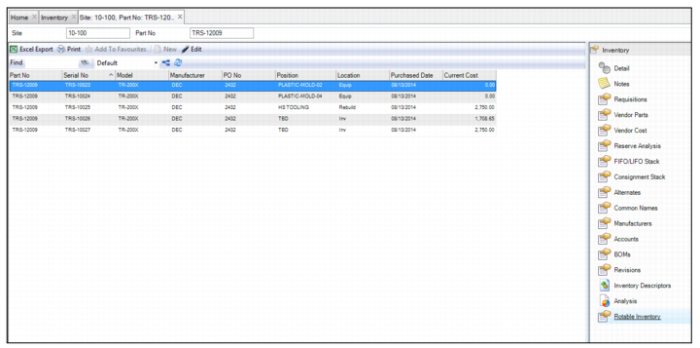
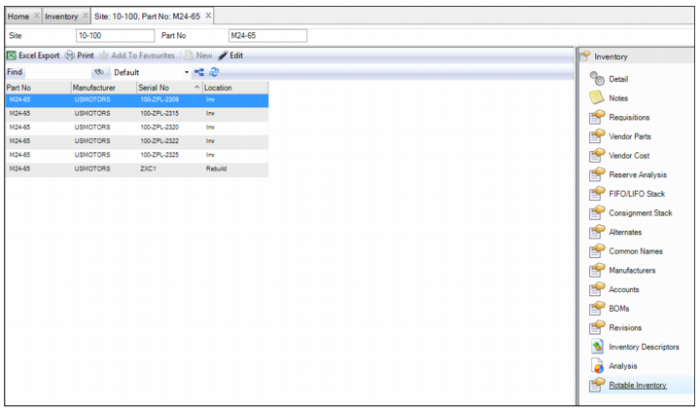
The Rotable Inventory submenu displays detailed information for each individual, serialized part that matches the inventory part number. You can customize the information that is displayed in this submenu by adding or removing columns. Some of the following information (columns) can be displayed:
Serial No
Displays the serial number for the rotable part.
PO No
Displays the PO number that was used to purchase the rotable part.
Location
Displays one of the following current locations of the part:
• Inv. The part is located in inventory.
• Equip. The part is issued to a piece of equipment.
• Rebuild. The part is being rebuilt and has been issued to a WO, requisition, or PO.
Position
Displays detailed information about the part’s location:
• Inventory. If the part is located in inventory, the Position field displays the storage location.
• Equipment. If the part has been issued to a piece of equipment, the Position field displays the equipment number.
• Rebuild. If the part is being rebuilt, the Position field displays the rebuild location.
Purchase Date
Displays the purchase date of the rotable part.
Current Cost
Reflects the cost entered when the part is returned to inventory from equipment or rebuild.
Rotable Inventory Submenu
View Cost Analysis for a Serialized Rotable Part
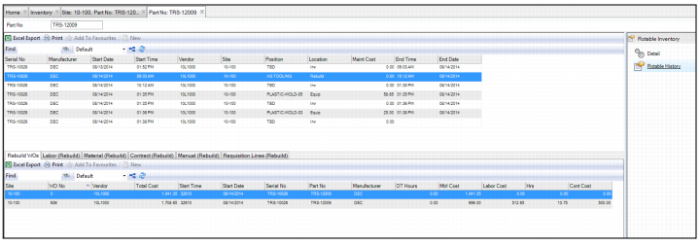
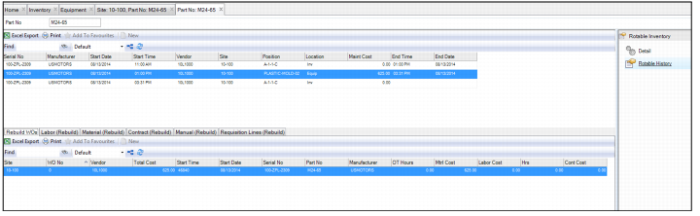
The Rotable History submenu displays detailed movement and cost analysis information about the serialized part.
The upper browse displays detailed movement history for the serialized part. It displays the locations and positions of the part when it was in inventory, when the part was issued to a piece of equipment, or when the part was repaired. The upper browse also displays when the movements occurred.
The lower browse displays detailed cost analysis information for the serialized part in the following tabs:
• Rebuild WOs. Displays any work orders that have been created and associated with the serialized part.
• Labor (Rebuild). Displays any direct labor postings to this serialized part and any labor postings to work orders associated with this serialized part.
• Material (Rebuild). Displays all part issues expensed to this serialized part, including direct issues and issues to work orders associated with this serialized part.
• Contract (Rebuild). Displays a list of all expenses charged to the serialized part on requisitions for contractors, including direct issues and issues to work orders associated with this serialized part.
• Manual (Rebuild). Displays manual GL transactions associated with the serialized part.
• Requisition Lines (Rebuild). Displays any requisitions and POs that have been created and associated with the serialized part.
Rotable History Submenu
Follow these steps to access the Rotable History submenu for a serialized rotable part:
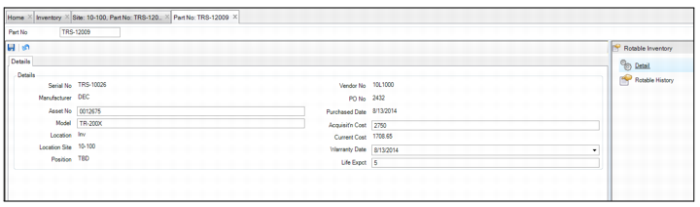
1 Open the rotable part record and select the Rotable Inventory submenu.
2 Double-click the serialized part to view the detailed part record for that serialized part.
Part Record for Serialized Rotable Part
3 Select the Rotable History submenu to view cost analysis information for the part.
Rotable Part Actions
Create a Rotable Part and Receive It into Inventory
A rotable part is not created until it is received into inventory. The following flowchart shows the process of creating a rotable part record, ordering the part, and then receiving a rotable part through the Purchasing module, in which specifics about the part, such as serial number and manufacturer, are required for input at the time of receipt.
Creating a Serialized Rotable Part Record
Follow these steps to create, order, and receive a serialized rotable part into inventory:
1 Create an inventory part record and designate the part as a rotable part. See
Defining an MRO Part.
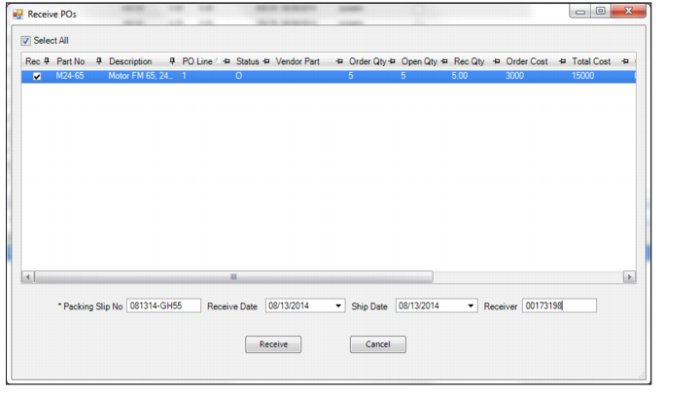
3 When the rotable parts are ready to be received, open the Purchase Order browse and highlight the PO record.
4 Select Receive PO from the PO Action menu. The Receive PO window opens. Enter the required information and click OK.
Receiving Rotable Parts
5 Because you are receiving rotable parts, the system displays a message that additional information for the rotable parts is required. Click Yes to continue.
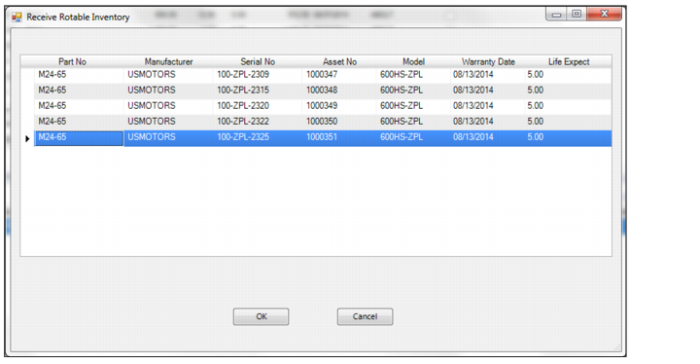
Receiving a Rotable Part
6 The Receive Rotable Inventory window opens. For each part, enter the manufacturer, serial number, asset number, and model number. Use the calendar lookup to select the warranty date and enter the life expectancy (in years) of each part.
Entering Rotable Part Information
7 Once all the information has been entered, click OK. EAM automatically creates rotable part records for each serial number.
8 The serialized rotable parts are now in inventory. Open the part record and select the Rotable Inventory submenu to view detailed information regarding each of the rotable parts that were received. You can double-click a serialized part to view the rotable part record associated with that serial number.
Rotable Inventory Submenu
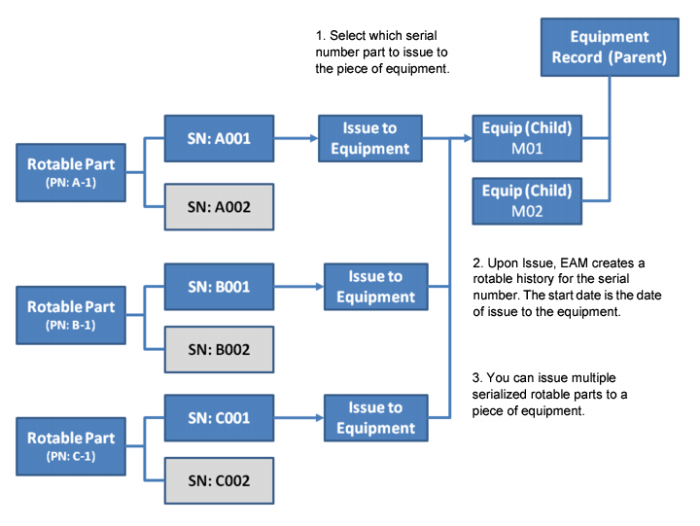
Issue a Rotable Part to a Piece of Equipment
When creating rotable parts, you must establish a virtual equipment record and connect it to a parent. This virtual equipment represents a location for the rotable part. When the part is issued to the virtual equipment, the information in its inventory record is copied to the equipment record. Since rotable parts are always issued to a virtual piece of equipment, the system essentially turns the shell of an equipment record into one reflecting the vital statistics of the rotable part. In other words, the virtual equipment’s manufacturer, serial number, asset number, model, vendor number, purchased date, acquisition cost, PO number, life expectancy, and installed date fields are filled with that information from the rotable part’s record.
Issuing Rotable Parts to a Piece of Equipment
Follow these steps to issue a rotable part to a piece of equipment:
1 Open the Inventory browse located in Inventory|Inventory and highlight the rotable part record.
2 Select Issue from the Action menu.
3 The Issue window opens. Using the Equip No lookup, select the piece of equipment to which you want to issue the rotable part.
Rotable Inventory Submenu
4 Click the save icon. The rotable part is now issued to the piece of equipment.
Note: You can issue multiple serialized parts to a piece of equipment.
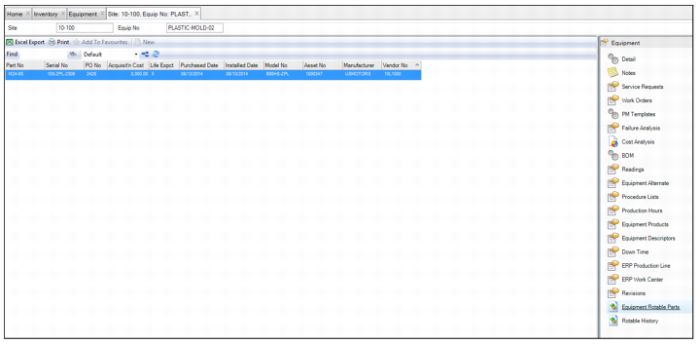
5 You can verify that the part has been issued to the equipment by opening the equipment record and selecting the Equipment Rotable Parts submenu. This submenu displays the rotable parts that are issued to the piece of equipment. Notice that the end date and end time have been recorded from the part’s time in inventory. A new start date and time were established when the part was issued to equipment.
Rotable Inventory Submenu
Return a Rotable Part into Inventory
When a rotable part is no longer needed in an area to which it was issued, return the part to inventory for future issues.
Follow these steps to return a rotable part to inventory:
1 Open the Inventory browse and highlight the rotable part record.
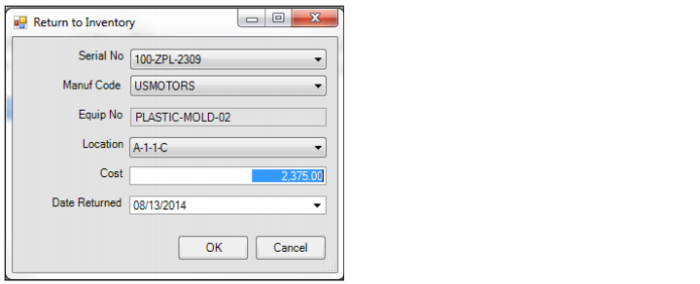
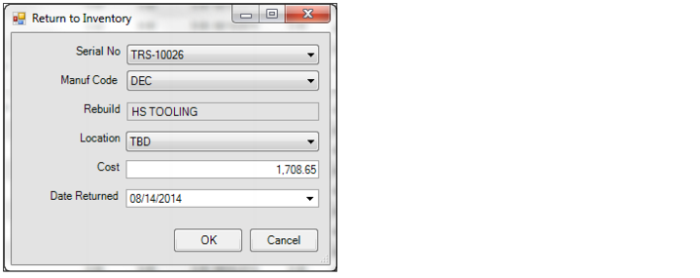
2 Select the Return to Inventory action. The Return to Inventory window opens.
Return Rotable Part to Inventory
3 Enter the serial number, manufacturer, and location information for the rotable part.
4 In the Cost field, enter the new cost for the rotable part based on its condition. This field allows you to establish a new value for the rotable part based upon its condition, length of previous use, and estimated lifespan.
Example: If the part originally cost $3,000 but now is worth $2,375 because the part has been used, enter $2,375 in the Cost field. When the part is returned to inventory, the system uses this cost to calculate the Maintenance Cost for the part, which is the difference between the original cost and the new cost. In this example, the Maintenance Cost would be $625 ($3,000 - $2,375).
5 Use the calendar lookup to select the date returned.
6 Click OK to return the part to inventory.
7 If you open the Rotable History submenu for that serialized rotable part, you can view all the movements of that part, including the return to inventory details.
Rotable History Submenu
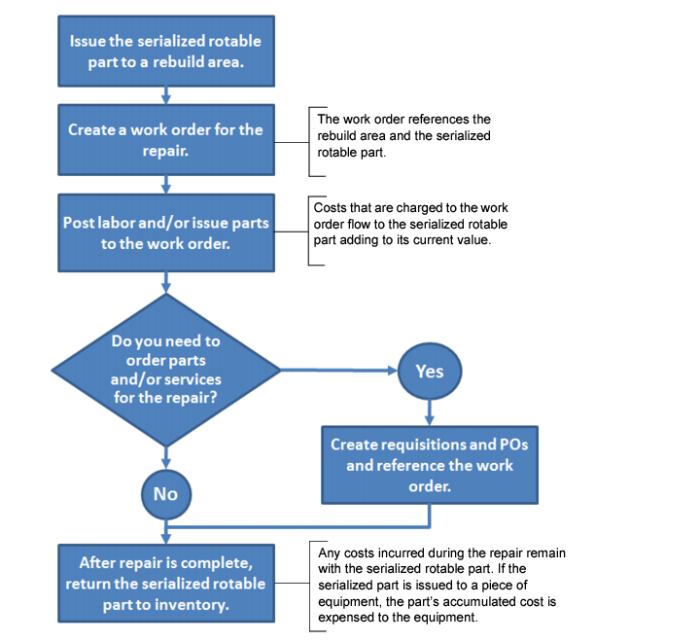
Rebuild/Repair a Rotable Part
Rebuilding a Rotable Part
Follow these steps to rebuild or repair a rotable part:
1 Open the Inventory browse and highlight the rotable part record.
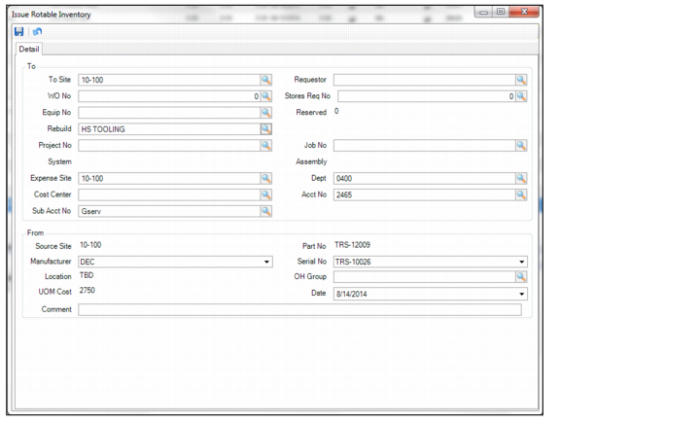
2 Select Issue from the Action menu. In the Rebuild field, use the lookup to select the rebuild area where the rotable part will be repaired.
Issue Rotable Part to Rebuild Area
3 Click the save icon.
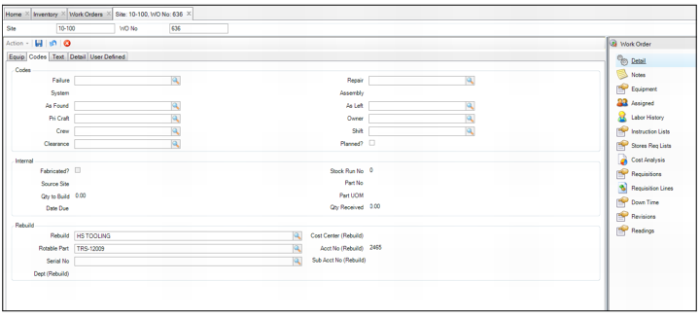
4 Create a work order for the repair. In the Rebuild field on the Codes tab, select the rebuild area where you issued the rotable part. In the Rotable Part field, use the lookup to select the serialized rotable part. For more information about creating work orders, see
Creating a Work Order.
Create Work Order to Repair Rotable Part
6 If you need to order parts or services, create requisitions and POs and reference the work order. Any costs associated with the requisition, PO, or work orders are associated with the serialized rotable part. See
Creating a Purchase Order.
7 Once the repair is complete, return the rotable part to inventory. Open the Inventory browse and highlight the rotable part record. Select Return to Inventory from the Action menu.
8 Enter the serial number, manufacturer, and location information for the rotable part.
9 Because this rotable part was on a work order, the cost that was accumulated while the part was being repaired is pulled into the Cost field. If necessary, you can edit this value.
Create Work Order to Repair Rotable Part
10 Once all the information has been entered, click OK.
11 The part is returned to inventory.