RMA Maintenance
The execution of RMA Maintenance follows several steps:
• Fill out the RMA header, including customer, end user, and call, and coverage information specific to RMA processing. This sets up default values for line item issues and receipts.
• Specify items to be shipped to the customer.
• Specify items to be received from the customer for repair or replacement.
• Enter trailer information, including trailer codes, tax, and standard credit information.
• Complete the trailer that totals billing amounts and trailer codes.
• Optionally ship or receive directly from RMA Maintenance. You can also use the separate ship and receive functions.
This section illustrates the frames used to complete this sequence.
RMA Maintenance (11.7.1.1)
Order
If you leave this field blank when you create a new RMA, the system supplies a number by appending the RMA Sales Order Prefix in RMA/RTS Control to the value in the Next RMA Sales Order field. The system increments this field.
Call ID
A pop-up window displays so that you can supply a call ID. This field is optional; RMAs do not have to reference a call. If you supply a call, several fields on the RMA default from the call: the sold-to address, which is the call customer; end user; purchase order; contract; and call service type. The call number and comments designated to print on invoices display on the invoice for the RMA.
Sold-To
If the RMA references a call, the customer associated with the call’s end user displays by default. Otherwise, you must supply a valid customer code.
Bill-To
This defaults from the Sold-To value unless you define the sold‑to address with a different bill-to.
End User
A pop-up window displays so you can enter the end user for the items being returned or replaced. If the RMA references a call, the end user defaults from the call. If you enter a nonexistent end user, the system prompts you to create a new end user directly from RMA Maintenance. The frames for creating an end user are the same as those displayed in Call Maintenance. See
End User Selection Frame for details.
Ship-To
Defaults from Sold-To. You can specify a different ship-to address for this customer, or you can create a ship-to address directly in RMA Maintenance by leaving the field blank.
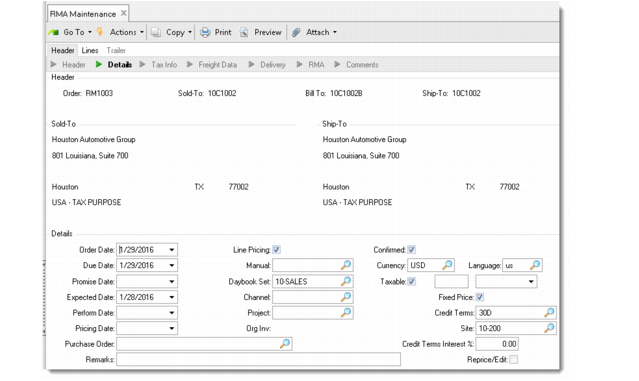
Order Date
Defaults from the system date and indicates the date you recorded this RMA. This can be the date you entered the RMA or the date the customer requested an RMA.
Due Date
Defaults from the system date plus the shipping lead time in Sales Order Control and indicates the date you need to ship the replacement items from your facility. This field provides the default date for each RMA issue line. The system uses the issue line due date to search for effective coverage limits for the line item.
Promise Date
Indicate the date the customer was promised delivery. The promise date can be different than the due date. Promise dates include delivery transit time, while due date is the date the items must be ready for shipment.
The header default is blank. If you leave it blank, the system automatically calculates line-item promise dates under these conditions:
• Calculate Promise Date is Yes in Sales Order Control.
• Transit time data has been defined for the ship-from site in Delivery Transit Time Maintenance (2.16).
See
QAD Master Data User Guide for information on transit times.
Expected Date
Defaults from the system date. Indicate the date you expect to receive items returned from the customer on this RMA and provides the default date for each RMA receipt line.
Perform Date
Enter the date originally planned to be the due date. This date does not include transit time and can be used to evaluate the accuracy of shipment due dates.
Pricing Date
The pricing date for an RMA defaults from the order date. This is unlike a standard sales order where the default comes from the value of SO Default Pricing Date in Pricing Control (1.10.1.24). This can have five possible values: Due Date, Order Date, Required Date, Promise Date, or Performance Date. The system uses Price Date in determining the effective date for price list searches.
Whether you can change Pricing Date on individual lines depends on the setting of Vary Pricing Date by SO Line in Sales Order Accounting Control (36.9.6). When that field is Yes, you can change the date on each line. When it is No, you cannot. Instead, the system automatically updates all lines when you change the header.
Purchase Order
Defaults from the call if you specified one. You can change this field. This field is required if the current end user is defined to require a PO.
Remarks
Any remarks specified for the sold-to customer display by default. You can change these to make them specific to this RMA. Remarks display on printed documents.
Line Pricing
This field has effect only for a newly created order. If you are maintaining an existing order, the system sets this field to No and you cannot change it. For a new order, it defaults from the Price SO by Line field in Pricing Control (1.10.1.24).
If No, the system prices each line without considering other lines on the order. This may not be the best price, since additional item quantities on other lines can qualify a line for a different price list. If Yes, the system prices each line item as it is entered in relation to other lines on the order and displays the best price. In either case, if prices change because of quantity breaks, the system recalculates them at the end of order entry.
Set this field to No to improve performance during order entry, since fewer calculations are performed.
Manual
You can apply field security to this field. Manual enables you to enter a price list code to be considered for RMA issue lines. Define this price list first with Manual set to Yes in Price List Maintenance (1.10.1.1). Manual price lists do not necessarily determine the issue line price. The system uses them with the other price list search algorithms to determine the best price.
Daybook Set
Enter the daybook set that will be used when this order is invoiced. This value defaults from Customer Data Maintenance.
Valid values depend on the setting of Use Daybook Set by Site in Sales Order Accounting Control:
• When Use Daybook Set by Site is Yes, the value you enter must either be defined in Daybook Set by Site Maintenance for the order header site, or that program must include a daybook set with a blank site value.
• Otherwise, the value you enter must be defined in Daybook Set Maintenance.
At Invoice Post and Print, the system assigns an invoice number based on one of the daybooks in the specified set. It selects the specific daybook code by determining the value and type of the invoice; for example, customer invoice or correction invoice.
Channel
Specify an optional code identifying the distribution channel through which this RMA originated. Channel can be used to determine GL sales and COGs accounts affected by inventory transactions. Set up optional sales accounts with Sales Account Maintenance (1.2.17) based on product line, site, customer type, and channel. To standardize usage, set up values in Generalized Codes Maintenance for field so_channel.
Project
Project code is one component of an account number defined in GL setup functions. Other account components are account, sub-account, and cost center. Each component you enter must be valid on its own and in combination with other account number components. The project on the header is the default for all line items. You can change this for any line.
Site
The RMA header site helps determine the default tax environment associated with the RMA. You can specify a different site at the item level. At the item level, Site defaults from the Customer Spares Site/Location and Customer Return Site/Location in RMA/RTS Control. If you use site security, the person executing this transaction must have access or the system generates an error.
Confirmed
For sales orders, this field defaults from Sales Order Control. For RMAs, Confirmed always defaults to Yes since direct contact with an end user has normally already taken place. MRP processes confirmed orders as sales demand and the orders consume forecast. The header’s Confirmed setting provides the default for each line item’s Confirmed field.
Confirmed orders are allocated, consume forecast, and create demands for Material Requirements Planning (MRP). Confirmed orders also affect the customer order total when the system reviews credit limits.
You cannot ship unconfirmed line items using RMA shipments. If unconfirmed, you must execute confirmation before shipment using RMA Confirmation.
Currency
Defaults from the currency of the customer Bill-To address. When you create an RMA, you can change this value to any valid currency. After you move to the next frame, you cannot change it.
When you specify a foreign currency, a pop-up displays the exchange rate relationship effective on the order date. You can change it or mark this rate as fixed. If the exchange rate is not fixed, the system uses the exchange rate effective on the invoice post date. If the exchange rate is fixed, the system does not change it.
Language
Defaults from the language associated with the Ship-To address. Use this field when printing formal documents, which can be run by selecting a range of language codes. This enables you to use preprinted forms in different languages. The system stores comment information with a language code.
Taxable, Class, Effective Date
Defaults from the values for the ship-to address. Indicate whether this RMA is subject to tax. The taxable status for the order header displays as the default for each line item, but you can change it.
Fixed Price
Defaults from the Fixed Price setting for the sold-to address. Indicate whether the prices are fixed or subject to updates due to inflation or commodity repricing. Fixed Price must be No for an RMA to be considered by Sales Order Repricing.
This use of fixed price is different from fixed prices as used in service pricing, which enable the customer to be invoiced for a fixed price regardless of the cost of items, labor, and expenses recorded.
Credit Terms
Defaults from the credit terms for the sold-to address. Credit term codes identify types of payment terms, defining the due date and discounts for early payment.
Original Invoice
This field does not apply to RMAs.
Credit Terms Interest
The implicit interest added into an item’s price based on the number of days to pay defined for the credit term. Use terms interest percent in hyperinflationary environments to accrue the estimated inflation increase.
The list price for the line item displays the included interest amount, based on the list price and the credit terms. This field sets the default for each issue line. You can modify it only if Vary Pricing By SO Line is Yes in Sales Order Accounting Control. When that field is No, you cannot modify individual lines. Instead, the system automatically updates the lines when you change the header value.
Reprice/Edit
You can edit this field only when you are maintaining an existing order. It indicates whether you can update prices for RMA issue lines or whether the prices come from current pricing data during this edit session. To change the charge type or prices for an issue line, Reprice/Edit must be Yes. Also, set this to Yes if you are combining RMA issue lines with sales order lines to accumulate quantities for price breaks.
This field affects only the current maintenance session. The value of Fixed Price determines which orders are repriced by Sales Order Repricing.
Reprice also affects RMA receipt lines. If you change the header service type or credit price list, existing receipt lines are affected only if Reprice/Edit is Yes or if you change the price fields on the line.
If Reprice/Edit is Yes, it affects all lines on the order and you cannot change it at the line level. If it is No on the header, a pop-up window during issue line entry enables you change it to Yes for the line. The system reprices new lines regardless of this setting.
Second RMA Header
When you click Next on the first RMA header frame, a second frame displays.
Second RMA Header Frame
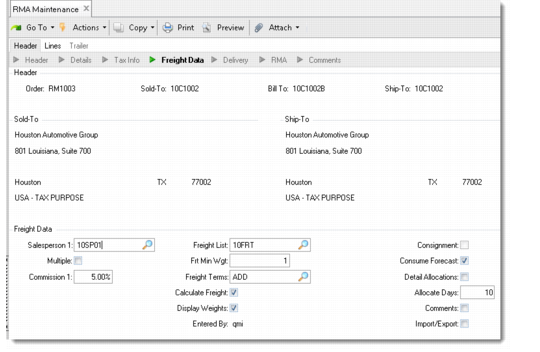
Salesperson
Defaults from the sales person for the sold-to address. Identifies the salesperson to receive commission and quota credit for this RMA. The salesperson information on each line item defaults from the salesperson and commission rate on the header.You can change it on each line item. To change the salesperson on a line item, set Multiple to Yes.
Multiple
Indicate whether more than one salesperson is responsible for this RMA. If this field is Yes, a pop-up window prompts you to enter up to four salesperson codes.
Commission
Specifies the commission percentage this salesperson is to receive. Besides the normal commission rate for the salesperson, you can enter commission rates for sales to specific customers or sales of specific product lines.
Freight List
Defaults from the freight list for the sold-to address. Freight list codes identify a set of shipping rates for different zones and shipping weights or units. The freight list on the header sets the default for each line item.
Freight Minimum Weight
Defaults from the freight minimum weight for the sold-to address. This field is the minimum weight on which to base the shipping charge if the freight list type is bulk. This field does not apply to freight lists of type unit. For bulk freight lists, shipments that weigh less than this amount are charged based on a minimum weight charge, not the shipment weight.
Freight Terms
Defaults from the freight terms for the sold-to address. The freight terms determine how the system applies freight charges. They can be added to the order trailer, added to the unit cost for each ordered item, displayed as a freight allowance, or not calculated.
Calculate Freight
Defaults to Yes for a new order; otherwise, defaults to No. If Yes, the system calculates site- and currency-specific freight charges on RMAs. Charges can be calculated for the line item’s shipping weight for unit price lists or for the order’s total shipping weight for bulk price lists. Calculated freight charges appear on the trailer.
Display Weights
Specifies whether to display the Freight window for each line item, which enables you to enter or modify data in the Freight Class and Freight Ship Weight fields. For inventory items, these fields default from the item master. For memo items, you must specify them. The Freight window also shows information the system uses to calculate freight for the line item, so you can review freight amounts easily.
Consignment
Defaults from Ship-To/Item Controls Maintenance, if a record exists for the order customer. Otherwise, it defaults from Customer Consignment Control. It sets the default for the same field associated with each line item on the order. You can change it at the line-item level if needed.
Consume Forecast
Defaults from RMA/RTS Control. This field specifies whether the quantity ordered on the RMA consumes available forecast. If Yes, the order consumes the forecast. If No, the system considers the order quantity abnormal and plans for it in addition to the forecast.
Detail Allocations
Defaults from RMA/RTS Control. Specifies whether you usually make detail allocations during line item entry. Detail allocations assign specific inventory lot/serial numbers and locations to be shipped on an order. The setting on the header determines each line’s default.
If Yes, at the line level, a pop-up window for detail allocations displays. If you do not detail allocate during line item entry, the system detail allocates when you print the RMA packing list.
Allocate Days
Defaults from the Allocate Days field in RMA/RTS Control. This field specifies the number of calendar days into the future for the system to use as a cutoff for allocating items on RMA issue lines. If the header’s due date extends beyond the allocation window, automatic allocation does not take place for a new issue line.
Allocation is subject to two settings in Sales Order Control:
• The Quantity Available to Allocate calculation method specifies how the system determines the number of items available to allocate.
• The value for Limit Allocations to Avail to Allocate determines how the system handles shortage situations. If this field is No, the quantity allocated for an RMA issue line defaults from the quantity ordered even if a sufficient quantity to allocate does not exist. If this is Yes, quantity allocated never exceeds the quantity available. If there is no quantity available to allocate, quantity allocated defaults to 0.
See
Inventory Allocations for more information.
Comments
Defaults from the Header Comments field in RMA/RTS Control. If this is Yes, the transaction comment frame displays for you to enter comments specific to this RMA. Enter information here that relates to the entire RMA, such as delivery information or credit comments.
Import/Export
Defaults from Imp/Exp Default in Intrastat Control and appears if Use Intrastat is Yes in the same control program. Set this field to Yes to enter or maintain import and export data for the order used to create Intrastat History Reports. If Yes, the standard Intrastat frames displays for input of appropriate data.
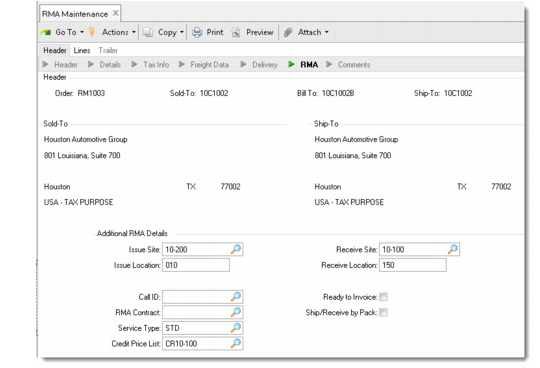
Additional RMA Details
The next frame requests information unique to RMA processing.
Additional RMA Details Frame
Issue Site
Defaults from Customer Spares Site in RMA/RTS Control and identifies the site from which you ship replacement items to customers. This site displays as the default for each RMA issue line, but you can change it. If you use site security, you must have proper access or the system generates an error.
Issue Location
Defaults from Customer Spares Location in RMA/RTS Control and identifies the location from which you ship replacement items to customers. This location displays as the default for each RMA issue line, but you can change it.
Receive Site
Defaults from Customer Return Site in RMA/RTS Control and identifies the site where you receive returned items. This site displays as the default for each RMA receipt line, but you can change it. If you use site security, you must have proper access or the system generates an error.
Receive Location
Defaults from the Customer Return Location defined in RMA/RTS Control and identifies the location where you receive returned items. This location displays as the default for each RMA receipt line, but you can change it.
Call ID
If you reference a call ID on the header, it displays here and you can change it. If you change the call after you create the RMA, the system does not recalculate the information that defaults from the call—sold-to, end user, purchase order, contract, service type.
RMA Contract
If you select a contract from the pop-up window of contracts for the specified end user, or if a contract defaults from a referenced call, it displays here. If a contract is available, it determines the coverage percentages and the default service type, which determines other coverage terms and conditions such as the credit price list, restocking charge, and ship before return setting.
If the service type of the contract is not changed, the Charge Type, or CT, field for RMA issue lines defaults to S, indicating service contract coverage.
The contract specified on the RMA header prints on the RMA invoice for both issues and receipts if a contract service type is used for coverage.
Service Type
Defaults from the contract displayed in the previous field, or the service type on the referenced call. Otherwise, defaults from Default RMA Contract in RMA/RTS Control.
The RMA header service type determines the default credit price list for returns, restocking charge to be added for returned items, and whether or not you can ship items before you complete a return. If you do not specify a contract in the RMA Contract field or no applicable limits exist on the contract, the service type determines the coverage percent applied to line item issues. The service type also sets the default charge type for issue line item entry. The values are: S if a contract type, W if a warranty.
If you change the service type on the RMA header after lines exist, its terms and conditions apply to new lines you add. They are applied to existing lines only if you reprice them. A message displays, indicating that you may want to review the coverage and pricing for existing RMA lines.
Credit Price List
Enter the price list code that applies to items returned on an RMA.This price list is accessed when processing RMA receipts to determine the amount of credit to give to the customer for the returned items.
The credit price list is ONLY used for RMA receipts. RMA receipt lines access price lists defined with Cust Schedule Price List Maint. You cannot enter a supplier price list in an RMA receipt.
The credit price is used in conjunction with any restocking charge defined for the service type in effect in RMA Maintenance. The credit is automatically reduced by the amount of the restocking charge. If no credit price list is available in RMA Maintenance or if a price for the item being received is not found, its price defaults to zero and must be specified manually.
Ready to Invoice
This field is initially set to No. After you have shipped or received items, the system sets it to Yes. Invoice Post and Print examines this field. It must be Yes before you can post the invoice. You can change the field to prevent invoicing.
If you ship more items later, the system sets Ready to Invoice to Yes so the RMA can be selected the next time invoices are posted.
Ship/Receive by Pack
This field is active only when Serialization Control is set to Active and works only for shipping and receiving serialized packs. When this field is set to Yes, you can directly issue serialized packs for RMA issue lines and receive returned serialized packs for RMA receipt lines in RMA Maintenance. When this field is set to No, use RMA Shipments and RMA Receipts to ship and receive RMA lines with serialized packs.
When you set it to Yes, RMA Issue/Receipt Processing frames are displayed after the Trailer frame, prompting you for serial ID for the issue line or the receipt line. For more information on shipping and receiving RMA with serialized items, see
RMA Issues and Receipts for Serialized Items.
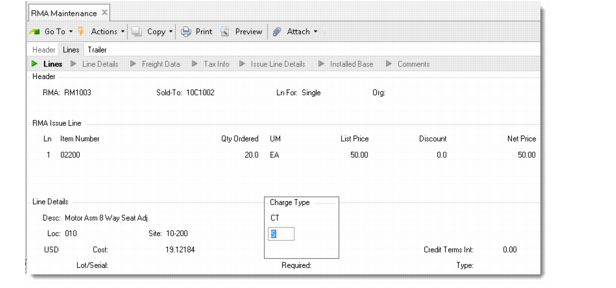
RMA Issue Line
This frame is similar to the line item entry frame for sales orders (7.1.1). Most fields in the item detail default from values in the RMA header, and have the same effect as described previously. This section describes the fields unique to RMAs.
If the item you enter has replacement types defined for it and the entry is on or past the item replacement's effective date, the system either prompts you to confirm the item replacement or displays pop-up frames to select other types of item replacements.
RMA Issue Line Entry Frames
Charge Type
After entering an item and quantity on a new line, a pop-up displays for entering a charge type. This code identifies how to bill the line item. If coverage is from a warranty type, charge type defaults to W. If coverage is from a contract or contract type, it defaults to S. You can define billable and giveaway charge types in RMA/RTS Control.
Charge types let you determine, per line, the service type for the item. Define four charge type/service type relationships using settings in RMA/RTS Control:
• The warranty charge type, set by the system to W, identifies charges covered under warranty. If the RMA header service type is a contract type and W is specified for the charge type, the system uses the level of coverage of the warranty service type in the control program.
• The contract charge type, set by the system to S, identifies charges covered under a service contract. If the RMA header service type is a warranty, specifying S brings in the coverage levels of the Default RMA Contract specified in the first frame of RMA/RTS Control.
• The giveaway charge type that you define in the control program can be specified as an override in RMA Maintenance and brings in the coverage level of the giveaway service type. This service type normally provides full coverage.
• The billable charge type, which you define in the control program, can be specified as an override in RMA Maintenance and brings in the coverage level of the Billable Service Type. This service type normally provides no coverage—the end user is responsible for the full amount.
You can modify the charge type for an existing line item only if Reprice is Yes for the line and you have not shipped any quantity.
List Price
You can apply field security to this field. The value in this field is the unit price before applicable discounts or markups are applied. The system uses this value in calculating the net price. The system posts the list price to the sales account when posting an invoice to AR or GL. If a difference between the net price and list price exists, the system posts the difference to the sales discount account.
During order processing, the system first determines the best list price for an item by searching for applicable price lists in Price List Maintenance with a list type of Price List. If more than one price list exists, the system uses the lowest price.
If Line Pricing is No, the system prices each line without regard to other lines. When order entry is complete, the system determines if the new lines qualify for any quantity breaks and recalculates prices accordingly.
You can change the calculated list price, discount, and net price if you have access to these fields. If you do, the system records a manual discount, which reflects the difference between the system-generated price and the price entered.
Discount
You can apply field security to this field. It displays the discount calculated by the system to be applied to this item. The number of decimals comes from the SO Factor Rounding field in Pricing Control.
The system accesses each applicable Discount %, Discount Amt, Markup, and Net Price price list. It then determines the combination yielding the lowest net price. The rules for combining price lists come from Combination Type in Price List Maintenance (1.10.1.1).
Once the system determines the best discount, it adjusts the price for minimum and maximum list amount and adds the coverage percent for the contract or service type. The value in the Discount % field includes discounts calculated based on pricing structures and the discount applied due to service coverage. Maximum discount is 100%. A message at the bottom of the screen indicates the portion of the discount percent that is derived from service coverage.
Note: You can display and enter Discount as a percent or as a factor, depending on the setting of Display SO Discounts As in Pricing Control.
Net Price
You can apply field security to this field. The system calculates this value by multiplying the list price by the discount %. If you enter a manual discount, the system recalculates net price based on it.
Product Line
When you leave the line item entry on a new line, a pop-up for Product Line displays. The default depends on the setting of Use Item Prod Line in SSM Accounting Control. If this is Yes, Product Line defaults from the item. If No, Product Line defaults from the service type. The product line determines the GL accounts affected by shipments on this RMA.
The system determines sales-related accounts and COGs accounts using this product line. Once you ship items on a line or invoice the line, you can no longer change the product line and the pop-up does not display. See
here for a discussion of product lines in RMAs.
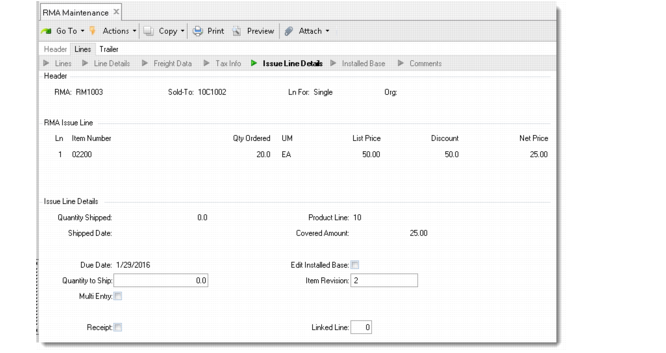
Issue Line Details
The next frame displays information unique to RMA processing. The first five fields—Qty Shipped, Shipped Date, Product Line, Covered Amount, and Due Date—are display only.
Issue Line Details Frame
Quantity to Ship
Enter a number to indicate the quantity to ship from RMA Maintenance during inventory processing.
Multi Entry
Defaults to No unless detail records exist, in which case it is set to Yes and cannot be changed. Indicate whether this issue transaction involves multiple sites, locations, lot/serial numbers, or lot reference numbers. Use this field only if you plan to ship from RMA Maintenance.
If Multi Entry is Yes and Quantity to Ship is nonzero, a window pops up for you to record issue details. Specify No if this transaction involves only one site, location, and lot/serial number, and the lot reference is blank.
Receipt
Indicate whether to generate a receipt line and link it to this issue line. If Yes, a pop-up window displays, enabling you to enter the item number, site, location, lot/serial, ISB reference, quantity expected, and price of the item to be returned from the customer. The system generates a receipt line and links it to the issue line. If No, you can enter and link receipt information later.
When a receipt line is linked to an issue line, the shipment cannot occur before the defective item is returned unless Ship before Return is Yes for the service type.
Edit Installed Base
Defaults from the value of Edit Installed Base in RMA/RTS Control and determines whether the Installed Base Detail frame displays. This frame enables you to change the defaults for installed base updates, such as whether to update the installed base, end user, warranty, and other details.
Item Revision
This defaults from the revision number you specified when you defined the issue line item in the Item Master.
Linked Line
If this issue line is linked to a receipt line, the receipt line number displays in this field. The system updates this field when you set Receipt to Yes to create an associated receipt line. If you add receipt lines later, you can update this field to link the receipt lines to the correct issue line.
When lines are linked, the system checks the value of Ship Before Return on the service type for the RMA. If this is No, you must process the receipt line before the shipment, or at the same time if you are shipping or receiving from RMA Maintenance. If you do not process the entire quantity expected on the return, you can ship only the number received.
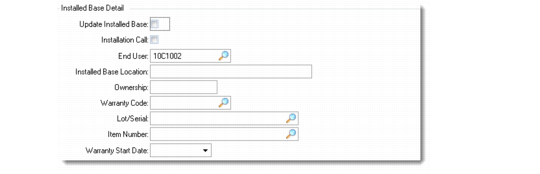
Installed Base Detail
The Installed Base Detail frame displays when Edit Installed Base is Yes in the previous frame.
Installed Base Detail Frame
Update Installed Base
This field defaults to Yes if the Installed Base field in Service Item Maintenance is Yes for the item and the Create ISB field is Yes for the end user in End User Data Maintenance. Yes indicates that an installed base record should be created for this line item. If Yes, when you post the invoice for this RMA, the system records the item and serial number in the installed base. The system uses information in the remaining fields in the Installed Base Detail frame when the record is created.
Note: The value of Create ISB for a new end user defaults from the Create ISB field in End User Control.
Installation Call
This field defaults to Yes if the item being issued requires an installation call and Auto Install Calls is Yes in Call Management Control. If Yes, the system creates an installation call when it adds the item to the installed base during invoice post. Use this for item installations that need an engineer’s technical expertise. If the item requires an installation call, set Installation Call to Yes in Service Item Maintenance.
End User
This field defaults from the end user on the RMA header. You can change it to another end user for this customer.
Installed Base Location
A reference-only field used for a 24‑character description of the current location of this installed base item at the end-user site. This might be a building location, suite number, or floor.
Ownership
A reference-only field indicating who possesses the item. If the end-user address code refers to a large company, you can enter the department or individual using the item. Set up values for ownership with generalized codes for field isb_owner.
Warranty Code
Defaults from the warranty for the item in Service Item Maintenance and determines the coverage terms and conditions including response time, credit price list, and days of coverage.
Lot/Serial
Enter the serial number of an item already in the installed base. Specify a value only if the current order line item should be added to the installed base as a component of another serialized item.
Item Number
May be left blank, but if specified, it must be an item currently in the installed base.
The item number of an item already in the installed base. This field is used to add the item being issued as a component of another item. For RMA receipts, it removes the component of a product configuration.
Warranty Start Date
The warranty start date defaults to blank. If you do not specify a date, the system uses the RMA ship date as the warranty start date when it creates the installed base record for the issue line item during invoice post.
The system calculates the warranty end date by adding the warranty duration to the warranty start date. If an install call is created for the item during invoice post, the system updates the warranty start and end dates again when the install call is closed based on the call closure date.
All system updates to the warranty start and end dates occur only if you do not specify a date. To let the system manage this date for you, leave the field blank.
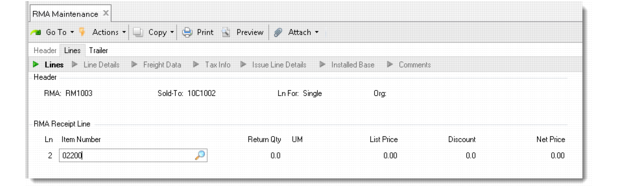
RMA Receipts
RMA receipts is similar to RMA issues. Most fields in the item detail default from values in the RMA header and have the same effect as described previously. The few differences are described here.
RMA Receipt Lines
List Price
You can apply field security to this field. List price comes from the RMA Credit Price List on the header, which in turn defaulted from the service type.
Discount
You can apply field security to this field. If a restocking charge exists for the service type, it displays in this field. In this case, you cannot modify Discount. A message displays indicating that a restocking charge has been applied. If you have not defined a restocking charge, you can enter a discount to be applied.
You can display and enter values in Discount as a percent or as a factor, depending on the setting of Display SO Discounts As in Pricing Control. The number of decimals is determined by the SO Factor Rounding field in Pricing Control.
Net Price
You can apply field security to this field. The system calculates net price based on the list price and discount. If you change Net Price and the discount is derived from a restocking charge, the system recalculates the list price.
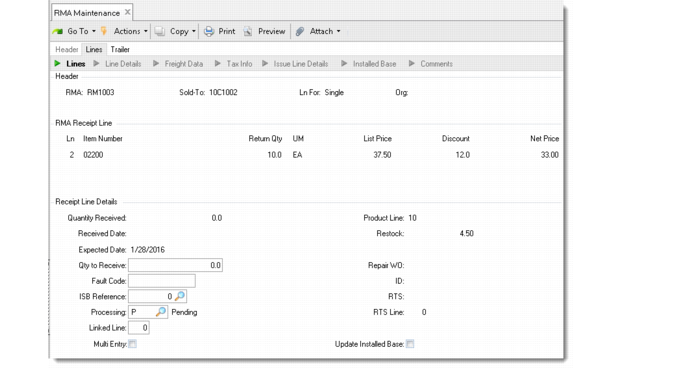
Receipt Line Details
The Receipt Line Details frame contains fields unique to RMA processing. The first five fields—Qty Received, Received Date, Expected Date, Product Line, Restock—are display-only fields. Qty Received and Received Date have values if a return has been made. Expected Date and Product Line default from the header. Restock displays the restocking charge for the service type.
Repair WO, ID, RTS, and RTS line are also output-only fields that have a value only if you have released the received item to a work order or created an RTS to return the item to the supplier for repair.
Receipt Line Details Frame
Qty to Receive
Defaults to 0. Specify a value to receive items directly from RMA Maintenance.
Fault Code
An optional code that identifies the problem or reason for the return. Set up fault codes for field rmd_fault_cd in Generalized Code Maintenance.
ISB Reference
Each item that is not controlled by serial numbers in the installed base needs a unique ISB reference number. If you specify the ISB reference on a return, the system can identify which item to remove from the installed base if Update Installed Base is Yes.
Processing
Enter one of three values:
• P (Pending). Enter P if you are not sure of the item’s disposition.
• W (Work Order). Enter W so RMA Release to Work Order can consider this line item when rework work orders are created.
• R (RTS). The value R is for reference only, and indicates that you plan to repair the item by returning it to the supplier.
Linked Line
If this receipt line is linked to an issue line, its line number displays in this field. If you did not link the receipt from the issue line, you can link the issue line from the receipt by specifying its line number here.
Multi Entry
Defaults to No unless detail records exist, in which case it is set to Yes and cannot be changed. Indicate whether this receipt transaction involves multiple sites, locations, lot/serial numbers or lot reference numbers. Use this field only if you receive items directly from RMA Maintenance.
If Yes and Qty to Receive is nonzero, another window pops up for you to record inventory details. Specify No if this transaction involves only one site, location, and lot/serial number, and the lot reference is blank. If you are using lot reference numbers, you must specify Yes even if only one item is being received.
Repair WO and ID
If the processing option for this line is W (work order) you can execute RMA Release to Work Order to create a work order for refurbishing the item. The work order number consists of the RMA number followed by the line number, separated by a period. The system updates this field with the work order number and ID created.
RTS and RTS Line
If you use an RTS to return the item to the supplier for refurbishment, the system keeps track of the RTS and line that shipped the item.
Update Installed Base
This field indicates if an installed base record for the item being returned should be deleted. It defaults to Yes when three conditions are true:
• The Installed Base field in Service Item Maintenance is Yes for the item.
• The Create ISB field is Yes for the end user in End User Data Maintenance.
• At least one installed base record exists for the item, lot and reference, or serial number specified.
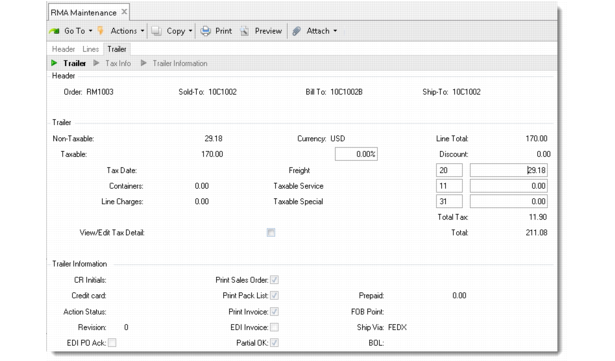
RMA Trailer
The RMA trailer is the same as a sales order’s. It displays charges and credits and information for shipping and invoicing.
RMA Trailer Frames
Most fields on the trailer default from the bill-to address—CR Initials, Credit Card, Action Status, Partial OK, Ship Via—or Sales Order Control and have the same function as in sales orders.
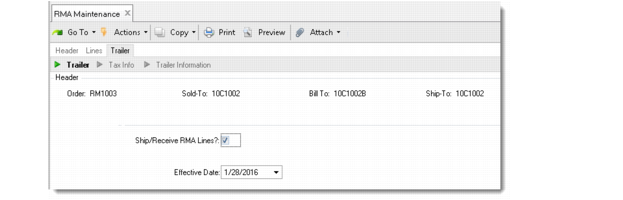
RMA Confirmation Screen
You can ship and receive items directly from RMA Maintenance. When you click Next after completing the trailer, you are prompted to display RMA lines. If you respond Yes, a confirmation screen displays, first for receipts, then for issues.
RMA Receipt Confirmation Frame
If you entered a quantity to receive or a quantity to ship earlier, it displays in the Qty to Receive or Qty to Ship column. The system prompts you to initiate shipment or receipt from RMA Maintenance.
Ship/Receive RMA Lines
Respond Yes to initiate the shipment or receipt of items with a nonzero quantity in the Qty to Ship or Qty to Receive column.
Effective Date
The default is the system date. The date in this field is the ship date for invoice generation and other accounting processes. Inventory transaction history uses the current system date and time.