Editing a Purchase Order
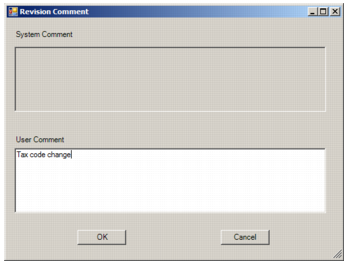
To edit a purchase order, open the PO and make the necessary changes to the PO record. When you have made all the changes, click Save. If you have Vendor Rev? selected on the Purchase Order tab in Sites, EAM displays the Revision Comment window.
Purchase Order: Revision Comment
Enter details in the User Comment box about the updates or changes you made to the PO and click OK. You can view the system and user comments in the Revisions submenu, and you can choose to include the user comments when you print the PO. See
Printing a Purchase Order.
Reopening a Canceled Purchase Order
A PO’s buyer can reopen a canceled PO. After the PO is reopened, you can make the same modifications to the PO that you can make to planned requisitions and planned POs.
Note: The reopen option only applies if Reopen PO/Reqs? has been enabled in General|Business Units|Domain on the PO/Reqs tab. See
Domain: PO/Reqs Tab.
To reopen a canceled PO, highlight the PO and then select Reopen Canceled PO from the Purchase Order Action menu.
Note: If the Any Buyer option is enabled for the domain, then any buyer in the system can reopen a canceled PO. The Any Buyer option is set on the PO/Reqs tab in General|Business Units|Domain. See
Domain: PO/Reqs Tab.
Reopening a Closed Purchase Order to Add Lines
A PO’s buyer can reopen a closed PO to add lines to it. Received lines remain closed and cannot be edited or reopened.
Note: If the Any Buyer option is enabled for the domain, then any buyer in the system can reopen a canceled PO. The Any Buyer option is set on the PO/Reqs tab in General|Business Units|Domain. See
Domain: PO/Reqs Tab.
Note: The reopen option only applies if Reopen PO/Reqs? has been enabled in General|Business Units|Domain on the PO/Reqs tab. See
Domain: PO/Reqs Tab.
To reopen a closed PO to add lines:
1 Highlight the PO in the browse and select Reopen to Add Line from the Action menu.
2 Select Requisition from the PO browse submenu.
3 Select New to create a new requisition.
The PO data defaults into the new requisition and you can enter more details into the enabled fields as needed.
4 Save the requisition.
5 Select New to add a requisition line. The new line has a status of P (Planned).
6 Enter details for the new line and then click Save.
The PO and requisition then proceed through the approval process that is dictated by their authorization settings. See
Place Added or Modified PO Lines on Order for more information.
Revisions and Vendor Revision by site are updated and track changes when a PO is reopened and lines are added, if those settings have been enabled. For more information, see
Enable Revision Control and
View the Revision History for a Vendor Record.
Locking/Unlocking a Purchase Order
For added security, the buyer associated with the PO can lock the purchase order. Only the buyer on the PO can modify or update a locked PO or any attached requisitions.
To lock or unlock a PO, select the PO and then select Lock/Unlock from the Purchase Order Action menu.
Note: If the Any Buyer? check box is selected in General|Business Units|Domain|PO/Reqs, any user set as a buyer is able to make modifications to another buyer’s PO, whether the PO is locked or unlocked. See
Domain: PO/Reqs Tab.
Modifying Currency on the Purchase Order
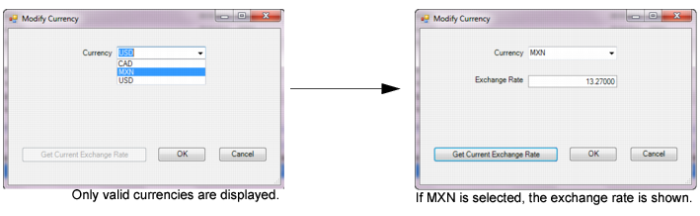
To modify the currency of a PO, select the PO and then select Modify Currency from the Purchase Order Action menu.
The Modify Currency option allows you to select a different currency code for POs with a Planned (P) status. The PO line items are changed to the new currency and the base currency amount is calculated based on the current exchange rate. Only one currency is allowed per PO. All currencies loaded into EAM are available for selection. If the Use Only Vendor Currency check box is selected in the domain for this PO site, only currencies valid for this vendor are available for selection. See
Multicurrency Purchasing.
Purchase Order: Modify Currency
Changing PO Status
The Change PO Status option in the Purchase Order Action menu allows you to change the status of a PO to Closed (C) or Cancelled (X). Changing the status of a PO changes the status of any PO lines as well.
Follow these steps to change the PO status:
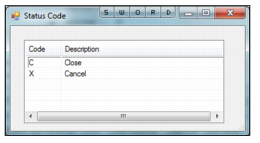
1 Select the PO. Then, select Change PO Status from the Action menu.
The Status Code lookup appears.
2 Double-click to select the new status:
• Close (C). Closes the PO. Users with the required security setting can reopen POs after they have been closed. Reopen the closed PO before you make adjustments such as a return to vendor or additional receipts. See
Reopen PO/Reqs? for information on the required security settings.
• Cancel (X). When you cancel a PO, any planned orders are canceled as well. You cannot cancel a PO that has been received against. You also cannot receive against a PO that has been canceled.
Change PO Status
Viewing the Vendors on a Purchase Order
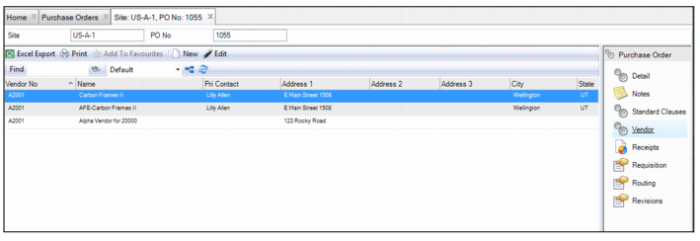
To view the vendors associated with a PO, open the PO and select the Vendor submenu. If you need more information, double-click and drill into the vendor record.
Purchase Order Vendor Submenu
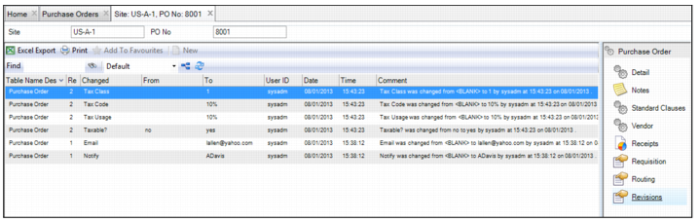
Viewing Revision History for a Purchase Order
Because many quality systems call for strict record keeping regarding the revisions made to POs, the Revisions submenu provides an audit trail of all modifications that are made to this record. The revision records, which are stored in the Revisions submenu and in the Revisions module at General|Revisions, are automatically created when a modification is made to the PO.
To view the revision history for a PO, open the PO and select the Revisions submenu.
Note: Revision control is activated in the Purchasing|General|Business Units|Sites menu. See
Enable Revision Control.
Purchase Order Revisions Submenu
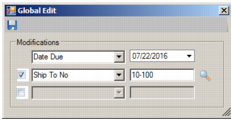
Globally Editing POs
You can edit multiple POs at once using the Global Edit action on the Purchase Orders browse. Follow these steps to globally edit multiple POs:
1 Open the Purchase Orders browse and select the POs to edit.
2 Select Global Edit from the Action menu.
PO Global Edit
3 In the Global Edit window, define the modifications you want to make. In the first drop-down menu, select the field to update. Then define the new setting in the field to the right. If you have more than one global edit to make on the selected POs, check the box in the second row of fields to make them active and set a second set of changes.
4 When you have defined all of your changes, click the Save icon.