QAD Enterprise Asset Management 2017.1
>
User Guide
>
Projects
>
Projects
>
Project Activities – All Project Types
Project Activities – All Project Types
EAM allows you to perform the following activities for all project types:
Posting Labor on a Project
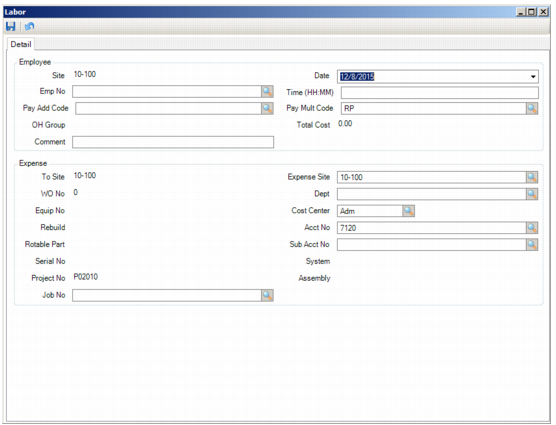
Use the Post Labor action to charge the employees’ time against the project.
Follow these steps to post labor on a project:
1 In the Project browse, select the project and then select Post Labor from the Action menu.
2 The Post Labor window opens. Fill out the necessary information in the Detail tab.
Post Labor
Employee
Site
The default site for the project.
Date
The editable date of the labor transaction defaults to today’s date.
Employee No
The number of the employee who performed labor on the project. You must identify an employee for a labor transaction. This employee number copies any corresponding information such as pay add rate, employee rate, and overhead group.
Time
The amount of time (in hours and minutes, separated by a colon) the employee worked on the activity for which labor is being charged.
Pay Add Code
Use the lookup to select a code that specifies an amount of money paid to an employee on an hourly basis, in addition to that employee’s regular hourly wage. This code can default from the Pay Add Code field in the General|Employees|Codes tab. See
Employee: Codes Tab.
Pay Multi Code
This code defaults in or you can use the lookup to select a code that adds a multiplier to the employee’s pay rate. Some examples are for regular time (1x the rate) or time and a half (1.5x the rate) for holidays or call-in pay.
OH Group
The employee’s overhead group. Default information:
• If posting labor from the Employee module, this field defaults from the employee’s OH group.
• If it is blank or not posting from the Employee module, the field defaults to the setting in the OH Group field in the General|Business Unit|Sites|Misc tab.
Total Cost
EAM calculates the total cost of a particular labor transaction.
Comment
Enter text that is attached to the labor record and can display in the Labor History browse.
Expense
To Site
The source or default site for the project.
Expense Site
Defaults to the current expense site for the project.
Note: The data in the following fields must have been added to the project to appear on this screen.
WO Number
EAM displays the work order number.
Dept
The department against which the cost on the labor record is charged.
Equip Number
The equipment number linked to the project.
Cost Center
The cost center against which the cost on a labor record is charged.
Rebuild
Use this field for work orders associated with rebuildable components.
Acct Number
The account number associated with a particular labor transaction.
Rotable Part
Select if the part is rotable.
Sub Acct No
The sub-account number used with an account number to charge the costs on the labor record.
Serial No
If the part is marked as rotable, enter the serial number of the part. Otherwise, no data is displayed.
System
If the labor transaction is against a piece of equipment and that piece of equipment has corresponding system codes, labor can be charged to this specific system as well as to the piece of equipment. Enter the specific system to which the labor can be charged.
Project No
The project associated with the labor transaction.
Assembly
If a system code is specified to also identify with a labor transaction associated with a piece of equipment after labor is distributed to that equipment, enter that system code.
Job No
This job number is identified in a labor transaction.
3 Once you have filled out the necessary information, click the disc icon to save. The labor charges post to the project and the Labor window reopens with all values reset. You can review posted labor in the Labor History submenu.
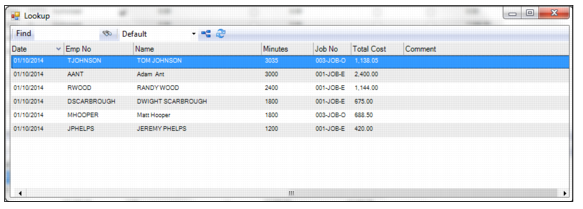
Reversing Labor on a Project
Follow these steps to reverse the labor that is charged to a project:
1 Open the Projects browse and highlight the project and job. Select Reverse Labor from the Projects Action menu.
2 A window opens listing the labor that has been posted on the project. Double-click to select the labor charges to reverse.
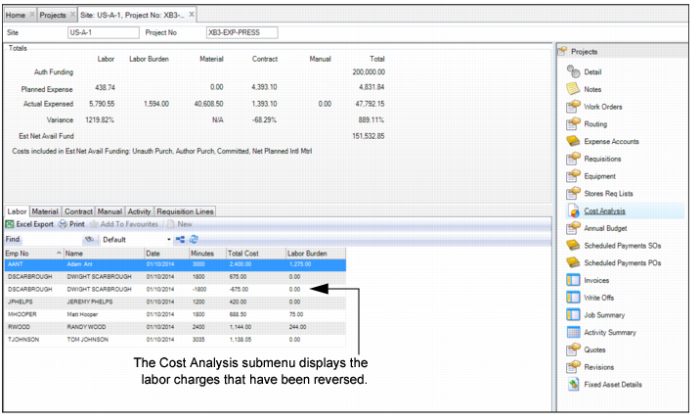
Reversing Labor Charges on a Project
3 The labor charges reverse and the lookup window reopens, displaying the remaining labor that is posted to the project. The Cost Analysis submenu displays the labor charges that have been reversed.
Reversing Labor Charges on a Project
Creating a Work Order for a Project
EAM gives you the ability to create a work order from a project. When you create a WO from a project, EAM pulls in all the data from the project and automatically enters it into the WO. This feature saves you time and ensures data integrity. If a WO has been created from a project, the WO is directly tied to the project and the associated WO numbers appear in the Work Orders submenu.
To create a work order from a project, open the project. Select the Work Order submenu and click New. Enter information about the work order in the fields. See
Creating a Work Order.
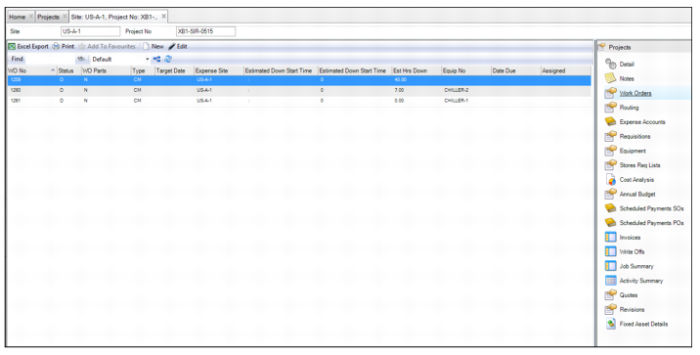
Viewing Work Orders Associated with a Project
To view the work orders associated with a project, open the project and select the Work Orders submenu.
Project: Work Orders Submenu
Creating a Quote for a Project
When you create a quote from a project, EAM pulls in all the data from the project and automatically enters it into the quote. This feature saves you time and ensures data integrity. If a quote has been created from a project, the quote is directly tied to the project and the associated quote number appears in the Quotes submenu.
To create a quote from a project, open the project. Select the Quotes submenu and click New. Enter the information in the quote record. See
Creating a Quote.
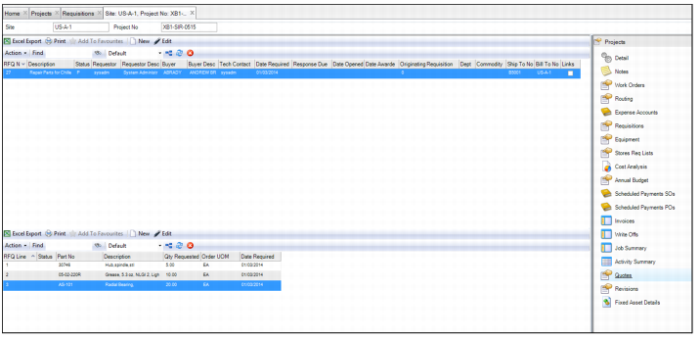
Viewing Quotes Associated with a Project
To view the quotes associated with a project, open the project and select the Quotes submenu. The quote header is displayed in the upper browse and the quote lines are displayed in the lower browse.
Project: Quotes Submenu
Creating a Stores Requisition List for a Project
When you create a stores requisition list from a project, EAM pulls in all the data from the project and automatically enters it into the requisition list. This feature saves you time and ensures data integrity. If a requisition list has been created from a project, the list is directly tied to the project and the associated requisition list number appears in the Stores Req List submenu.
To create a stores requisition list for a project, open the project. Select the Stores Req List submenu and click New. Enter the information in the requisition list record. See
Creating a Stores Requisition List.
Viewing the Stores Requisition List for a Project
To view the stores requisition lists associated with a project, open the project and select the Stores Req List submenu. The requisition list header is displayed in the upper browse and the requisition list lines are displayed in the lower browse.
Project: Stores Requisition List Submenu
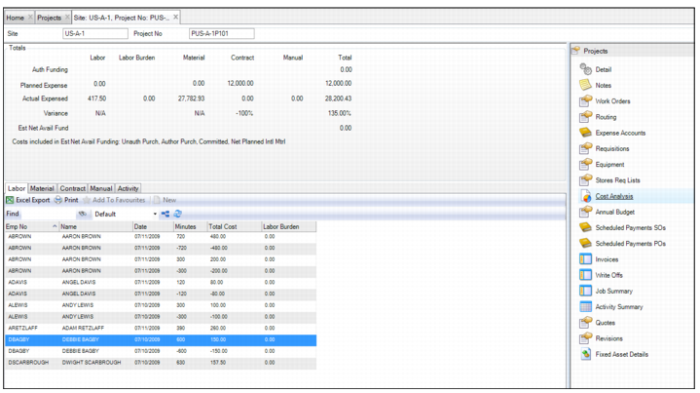
Reviewing Cost Analysis for a Project
The Project Cost Analysis submenu allows you to view detailed cost analysis for an individual project. At a glance, you can see the accumulated cost for the project and any type of planned cost. You can review cost summaries and totals and by using tabbed pages you can find the details of those costs, such as labor postings, part issues, outside contractor charges, manual GL transactions, and expenses by job activities.
Cost Analysis is updated when you use the Refresh action for the project. Cost analysis amounts for both projects and jobs update to reflect current balances and amount details.
Project Submenu: Cost Analysis
Cost Analysis Totals
The following totals are displayed in the Cost Analysis submenu:
• Auth Funding. EAM only considers the amount in the Authorized Funding field when considering spending limits for a project. Authorized Funding is automatically populated based on the Requested Funding amount, depending on the Project Authorization site setting.
If Project Authorization is required, this amount appears in the Authorized Funding once approved. If Project Authorization is disabled, the amount entered in the Requested Funding field automatically populates the Authorized Funding field.
• Planned Expense. Calculated as follows:
Planned Expense = Labor Planned + Material Planned + Contract Planned
Labor Planned = Open work orders and craft.req_rate * wo_instr.std_hrs * wo_instr.craft_nbr
Material Planned = Open non-Contract Purchases + Open Stores Reqs (wo_parts.tot_cost)
Contract Planned = Open Contract Purchases
• Actual Expensed. Sum of cost from respective detail tabs on Cost Analysis.
• Variance. Calculated as follows:
Variance % = (Actual Expense/Planned Expense) – 1
• Est Net Avail Fund. The net amount of funding available for the project calculated by subtracting the costs indicated in the Costs Included in Estimated Net Available Funding field and Total Spent from the Auth Funding amount.
Cost Analysis Tabs
The Cost Analysis submenu contains the following tabs:
• Labor. Displays detailed labor cost records.
• Material. Displays detailed material cost records.
• Contract. Displays any contractor cost records.
• Manual. Displays manual GL records. If you have used the project ID in an Unposted GL Transaction, you must post the transaction to have it appear in the project cost analysis.
• Activity. Display detailed activity cost records.
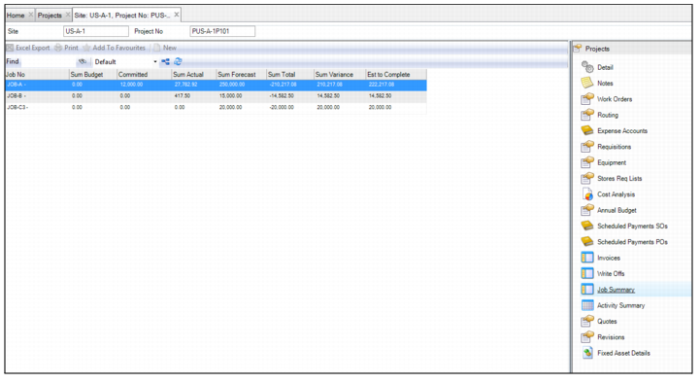
Reviewing the Job Summary for a Project
The Job Summary submenu displays a report listing the jobs and their cost analysis summary associated with this project.
Project Submenu: Job Summary
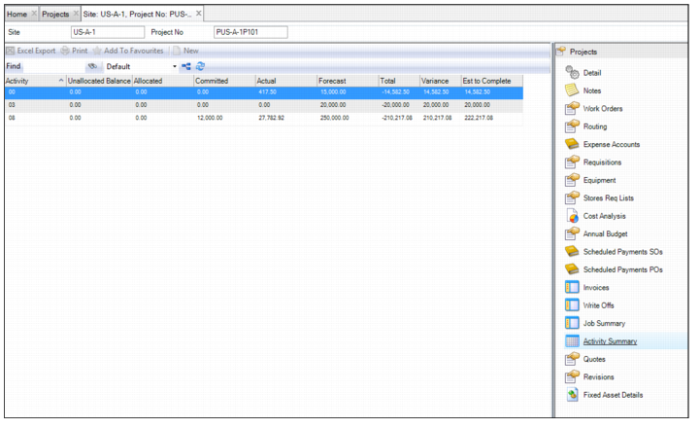
Reviewing Activity Summary for a Project
The Activity Summary submenu displays a report listing the activities and their cost analysis summary associated with this project.
Project Submenu: Activity Summary
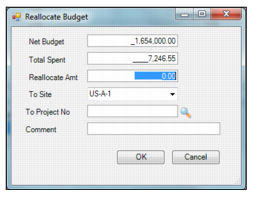
Reallocating a Budget To or From Another Project
Follow these steps to reallocate the budget to or from another project:
1 Open the Projects browse and highlight the project from which you want to reallocate the budget.
2 Select Reallocate from the Projects Action menu.
3 The Reallocate window opens. Enter the necessary information into the following fields:
Net Budget
Displays the budget for the project from which you are reallocating funds.
Total Spent
Displays the total amount spent for the project from which you are reallocating funds.
Reallocate Amount
Enter the amount you want to reallocate to the project.
To Site
Defaults to the user’s site. If necessary, select a different site from the drop-down list.
To Project Number
Use the lookup and select the project to which you want to reallocate funds.
Comment
Enter any necessary comments.
Project Submenu: Activity Summary
4 Once you have entered the information, click OK.
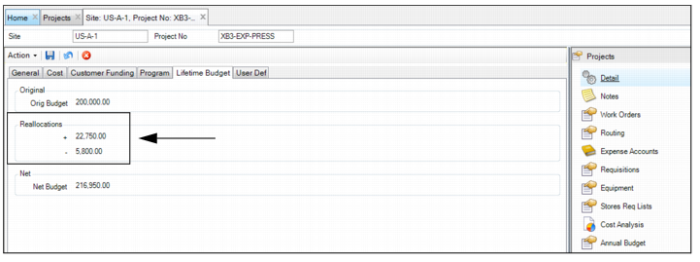
5 The reallocation to and from totals are displayed on the Lifetime Budget tab.
Project Reallocation Amounts
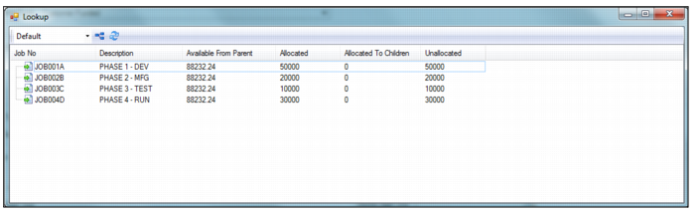
Job Allocation View
The Job Allocation View action allows you to a view the jobs associated with a project and their funding. This view contains the following fields:
• Job No and Description. Displays the job number and description.
• Available from Parent. Displays the amount available to this job from a parent job.
• Allocated. Displays the amount allocated to this job. Allocated amount cannot exceed the Available from Parent amount.
• Allocated to Children. Displays the amount allocated to child jobs of this job. This amount cannot be more than this job’s allocated amount.
• Unallocated Balance. Displays the amount available to the job that is not yet allocated. This amount is equal to Allocated – (Allocated to Children + Total spent at this Level).
Note: The Job Allocation View is only available when the Use Allocations? check box on the Project Cost tab is selected. See
Project: Cost Tab.
Job Allocation View