Recording Bill Payments
After a bill is set to confirmed in Bill Print, the bill is sent to the customer.
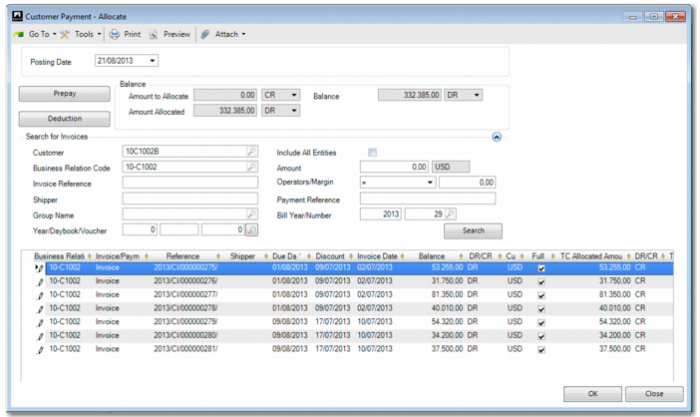
Customer Payment Allocate
When a customer pays a bill in part or in full, you can record the payment in Customer Payment Create by allocating the payment to the bill.
1 Open Customer Payment Create (27.6.4.1).
2 In the Customer Code field, enter the customer code. The remaining fields are automatically filled, including details of the outstanding payment.
3 Click Allocate.
4 In the Customer Payment - Allocate screen, in the Search for Invoices section, complete the Bill Year/Number number fields and click Search.
Important: The fields in Customer Payment Create - Allocate that enable you to select a bill are hidden by default. You can add the fields in Design mode.
5 All the invoices belonging to the bill are displayed in the grid, as shown in
Customer Payment Allocate. By default, all invoices are fully allocated. Clear the Full field for any invoices on the bill that are not included in this payment.
Customer Payment Allocate
6 To allocate the invoices, click OK.
7 To complete the payment, in the Customer Payment Create screen, click Save.
When all the invoices on a bill have been fully allocated, the bill status is changed to Closed. You can check this in Bill View.
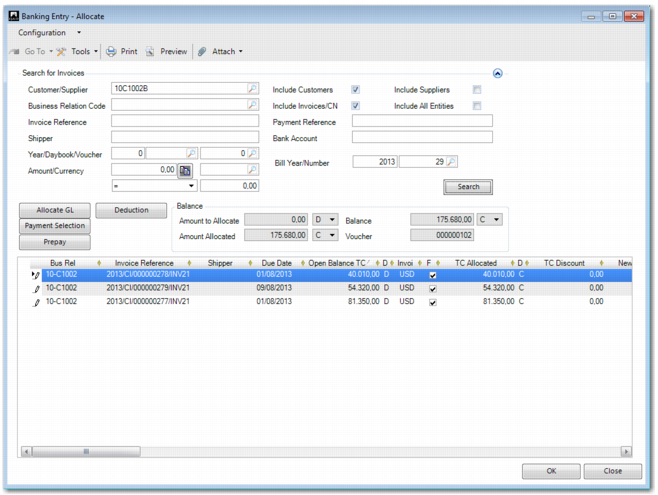
Banking Entry Allocate
To receive a complete or partial bill payment and to record the payment, use Banking Entry Allocate.
1 Open Banking Entry Create (31.1.1).
2 In the GL Account field, enter the bank GL Account number.
3 In the grid, select the unallocated line and in the right-click menu, choose Allocate to Invoice.
4 In Banking Entry - Allocate, enter the customer code in the Customer/Supplier field.
5 Complete the Year/Bill Number fields and click Search.
Important: The fields in Banking Entry Create - Allocate that enable you to select a bill are hidden by default. You can add the fields in Design mode.
Banking Entry Allocate
7 In the Banking Entry Create grid, in the TC Amount field, enter the amount you want to allocate—for example, the full amount—and click Save.
Open Item Adjustment Create
Open Item Adjustment enables you to record payment of a bill, either for a full bill or for a partial payment. In addition, if any invoices on a closed bill are reopened, you can change the status of the bill to confirmed by using Open Item Adjustment.
1 Go to Open Item Adjustment Create (25.13.5).
2 Complete the relevant Posting Info fields, including Posting Year/GL Period, Daybook Code, and Description.
3 In the Customer/Supplier field, enter the customer for whom you want to do an open item adjustment for a bill.
4 Complete the Year/Bill Number fields with the relevant bill. Before you click Search, ensure that Include Customers is selected. If you want to reopen a closed bill, ensure that Include Closed Items is also selected.
Important: The fields in Open Item Adjustment that enable you to select a bill are hidden by default. You can add the fields in Design mode.
5 In the grid Paid TC column, adjust the relevant invoice or invoices and click New Item.
6 Complete the Customer/Supplier, Description, and Invoice Status Code fields and click Save.
7 The invoice is now adjusted or reopened. You can confirm the adjustment in Bill View.
Customer Aging By Bill History
To find out which customer invoices are overdue on a bill, use Customer Aging By Bill History (27.17.20). For details of this report, see
Customer Aging By Bill History Report.
Customer Invoice Extended View
Use Customer Invoice Extended View (27.18.4) to analyze activity on individual bill invoices. You can search for invoices by Bill Date, Bill Due Date, Bill Year, Bill Number, and Bill Entity. You can also add these criteria as grid columns to help you ascertain the bill an invoice belongs to and its expected due date.
If you right-click an invoice and select Customer Invoice Activity, you can also configure the grid in Customer Invoice Browse for Customer Invoice Activity to display the same criteria.
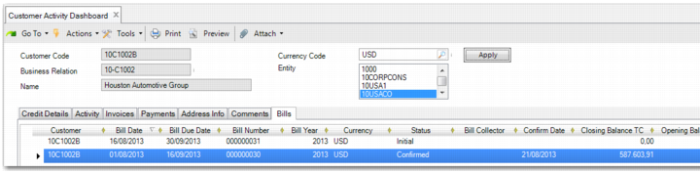
Customer Activity Dashboard
In the Customer Activity Dashboard (27.18.1), when you search for a customer who has bills scheduled, a Bills tab is displayed.
Customer Activity Dashboard Bills Tab
The Bills tab provides visibility on all bills with status Initial and Confirmed that were created in the entities that you select on the dashboard.
When you right-click and select Bill View or you double-click a bill line, Bill View is opened and you can analyze the individual invoices belonging to the bill.
For full details of Customer Activity Dashboard functionality, see
Customer Activity Dashboard.