Container Move
The following sections describe setup, processing, and monitoring for container move functionality, which includes features that:
• Let staff move any pallet with detail allocation and containerization to any other location, including another truck.
• Optionally, let you add staging or validation steps when moving containers.
• Facilitate cross-docking functionality.
• Report the position of each pallet in the truck.
• Load pallets in the appropriate reverse dropping order if a drop-off sequence has been specified in a load.
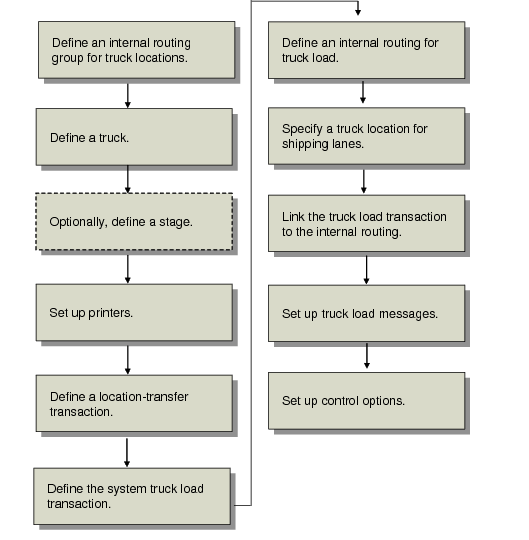
Setting Up Container Moving
There are several steps involved to complete the setup for container moving. Once completed, all processing takes place on the RF device. Although you can define any location for moving containers, the examples, figures, and paragraphs in this section focus on setting up a truck as a location.
Container Move Setup shows the setup tasks for container move functionality.
Container Move Setup
Defining an IRG for Truck Load
You must define an internal routing group (IRG) for all truck locations in
Internal Routing Group Maintenance (4.2.1). To do this:
• Specify the truck as the Internal Routing Group.
• Set Functional to Yes.
• Optionally, set additional fields or accept the defaults.
If you optionally define a stage location instead of a truck location, you must define the IRG for the stage location, not the truck location. By defining an IRG for a stage location rather than a truck location, you let staff perform the following movements:
• From the shipping lane to the stage area
• Between locations in the stage area
• Between the stage area and the truck location
• Between a truck and the stage area (that is, return to a stage area from the truck location)
Staff cannot return to the stock area or any other IRG from the stage area. If you require staff to perform this type of return movement, build a custom IR assignment program.
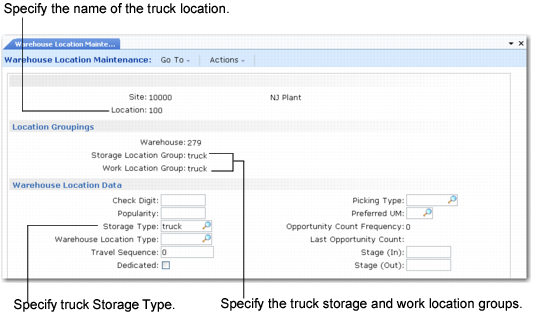
Defining a Truck Location
To use container move features, you must set up the truck as a location and specify its storage location group and storage type. For example, you can define a Truck location and specify the storage location group and storage type as Truck. When a truck is defined as a storage location, you can use functions to report on truck capacity and contents and the warehousing system can use the truck location for storage.
Use
Warehouse Location Maintenance (4.3.13) to specify storage location and work location groups for the truck.
Warehouse Location Maintenance (4.3.13), Truck Location shows the fields to set.
Warehouse Location Maintenance
(4.3.13), Truck Location
Defining an Optional Stage Location
Optionally, you can define a
stage location—a shipment staging area—instead of a truck location. To do this, in Warehouse Location Maintenance (4.3.13), set the same fields for a stage location that you do for a truck location; see
Warehouse Location Maintenance (4.3.13), Truck Location.
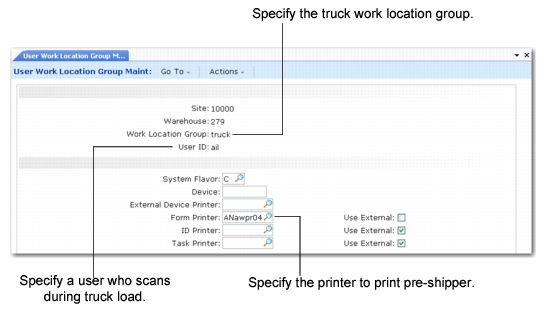
Setting a Printer
You must print the shipper before using truck-loading features. Typically you print the shipper before confirming the shipment. To do this, you must assign a form printer to either the:
• User who scans while loading
• Work location group (WLG) of the truck location
Important: If you decide to assign printers to users, you must create a record for all users. Typically it is easier to simply assign the printer to a work location group.
The system looks first for a printer assigned to the user who is logged onto the RF device and performing the truck loading, then for a form printer assigned to the WLG of the truck location.
Create a work location group for the truck location with Work Location Group Maintenance (4.3.9). You can associate the user with the truck work location group in User Work Location Group Maintenance (4.11.3.13). Then define print options for that user.
User Work Location Group Maintenance (4.11.3.13)
If you do not set up printers for a combination of user and work location group, use Work Location Group Maintenance to assign the form printer to the work location group in the Printing frame.
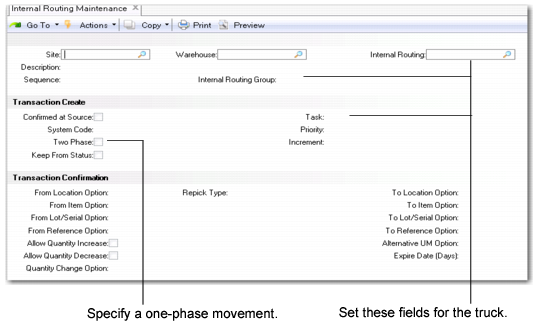
Defining an IR for Truck Load
You must define an internal routing (IR) for the truck load transaction type. Define the internal routing for type LOC-TR with a single step that moves to the truck IRG.
Note: The location transfer transaction (LOC-TR) is included with the system data as a generalized code for field tr_type.
Define a single-step movement that lets staff move items:
• From the shipping lane IRG to the IRG truck location
• Between locations of the same IRG should you need to transfer from one truck to another
Use
Internal Routing Maintenance (4.2.5) to define a one-phase movement for the truck. A one-phase internal routing represents movement within the IRG.
Important: Do not specify a two-phase movement for the truck.
Internal Routing Maintenance (4.2.5)
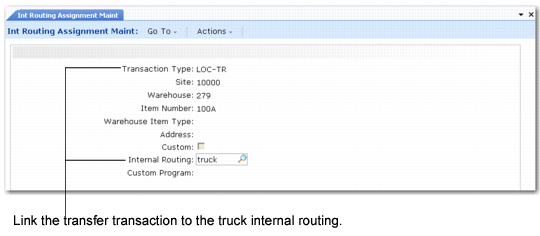
Linking the Truck Load Transaction Type to the IR
You must link the truck load internal routing to the truck location transfer transaction. Use
Internal Routing Assignment Maintenance (4.2.9) to assign an internal routing to the LOC-TR transaction.
.
Internal Routing Assignment Maintenance (4.2.9)
Customizing Internal Routings
When you set up internal routings for a truck or stage location, typically staff cannot return to the stock area or any other IRG from the truck or stage area. If you require staff to perform this type of return movement, build a custom IR assignment program. You must consider the different combinations between the truck/stage area and the IRGs.
Specify the custom program in Internal Routing Assignment Maintenance (4.2.9) by:
• Setting Custom to Yes
• Entering the name of the custom program in Custom Program
When you run the custom program, you must provide the input fields that enable the program to decide which IR to assign.
Specifying Truck Location for Lanes
You define the truck as a destination location by:
• Specifying the ship-to code in the Ship-To field for the order in Sales Order Maintenance (7.1.1)
• Specifying the truck location name in the Lane/Dock field in Lane Maintenance (4.15.1.1) See
Defining Lanes and Docks.
If you do not specify a truck location, the system uses the warehouse as the truck location; however, warehouse staff can override the warehouse location and manually enter a valid truck location or stage area on the RF device.
Setting Up Control Options
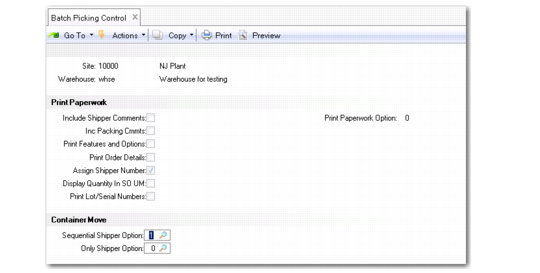
Set up container move options in the Batch Picking Control (4.15.24) Container Move frame.
Batch Picking Control (4.15.24), Container Move Frame
Sequential Shipper Option
Specify the type of message the system displays when it checks for partially loaded pre-shippers or shippers; that is, pre-shippers/shippers for which the truck loading began, but pallets still remain to be loaded.
0: The system does not display messages and does not take action.
1: The system displays a warning message.
2: The system displays a message and prompts for user confirmation of the message before continuing.
3: The system displays an error message and you cannot continue.
Use the setting to ensure all pallets for a given shipment are loaded consecutively in the truck, ideally in the reverse order of unloading so that the unloading process is easier.
Example: You have three shippers for which you are loading a truck: Shipper 1 has three pallets, all of which are loaded. Shipper 2 has two pallets, only one of which is loaded. Shipper 3 has two pallets, none of which are loaded. You set this option to 3. The system displays an error message when you attempt to load and scan pallets for Shipper 3 because Shipper 2 has a pallet remaining to be loaded.
Only Shipper Option
Specify the type of message the system displays when it verifies whether users can load both pre-shippers and shippers or just shippers. If you set this option so that users can continue processing despite messages before loading the truck, the system converts any selected pre-shippers to shippers.
0: The system does not display messages and does not take action.
1: The system displays a warning message.
2: The system displays a message and prompts for user confirmation of the message before continuing.
3: The system displays an error message and you cannot continue.